Nginx搭建RTMP服务器
一、环境与准备文件
1.1 开发环境
- 开发环境:Windows
- 开发工具:ffmpeg、nginx 1.7.11.3 Gryphon、nginx-rtmp-module、VLC media player
1.2 官方下载地址
| 工具 | 下载地址 |
|---|---|
| ffmpeg | http://www.ffmpeg.org |
| nginx | http://nginx.org/en/download.html |
| nginx 1.7.11.3 Gryphon | http://nginx-win.ecsds.eu/download/nginx |
| nginx-rtmp-module | https://github.com/arut/nginx-rtmp-module |
| VLC media player | https://www.videolan.org/vlc |
二、直播协议概述
2.1 RTMP
实时消息传输协议(Real Time Messaging Protocol),是 Adobe Systems 公司为 Flash 播放器和服务器之间音频、视频和数据传输开发的开放协议。
- 协议基于 TCP,是一个协议族,包括 RTMP 基本协议及 RTMPT/RTMPS/RTMPE 等多种变种
- 实时性比较强,基本能保证延迟在 1-2s 内,是现在国内直播主要采用的方式之一
- 需要安装 Flash,H5、iOS、Android 并不能原生支持
2.2 HLS
Apple 推出的直播协议,通过视频流切片成文件片段来直播。
- 客户端首先会请求一个 m3u8 文件,里面会有不同码率的流,或者直接是 ts 文件列表
- 实时性较差,但 H5、iOS、Android 都原生支持
2.3 HTTP-FLV
对 RTMP 协议的封装,相比于 RTMP 是一个开放的协议。
- 具备了 RTMP 的实时性和 RTMP 不具备的开发性
- flv.js 使得浏览器在不依赖 flash 的情况下播放 flv 视频,兼容移动端
三、安装 nginx、ffmpeg 与启动
3.1 安装目录结构
将所有组件放置在同一目录下:
1 | E:\technology\ |
3.2 配置环境变量
右键我的电脑 > 属性 > 高级系统设置 > 高级 > 环境变量 > 双击 Path,添加以下路径:
1 | E:\technology\ffmpeg-4.2.1-win64-static\bin |
3.3 启动 nginx
(1)直接双击 nginx.exe,双击后一个黑色的弹窗一闪而过
(2)打开 cmd 命令窗口,切换到 nginx 解压目录下,输入命令 nginx.exe 或者 start nginx,回车即可
四、检查 nginx 是否启动成功
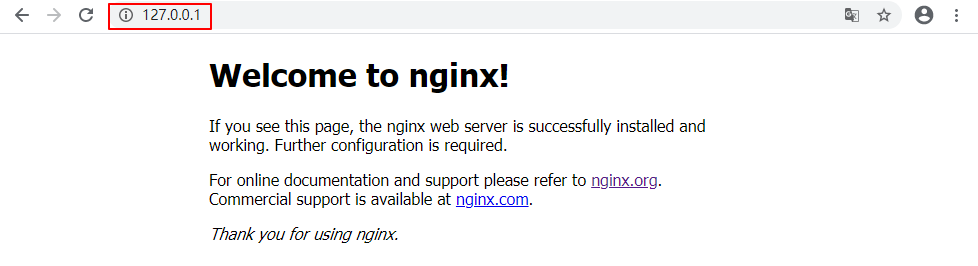
4.1 浏览器访问
直接在浏览器地址栏输入网址 http://127.0.0.1:80 或 http://localhost:80,回车,出现以下页面说明启动成功:
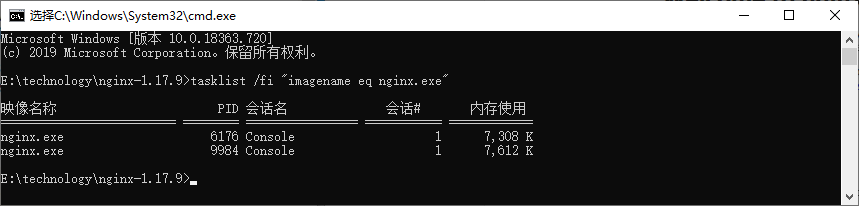
4.2 命令行检查
在 cmd 命令窗口输入命令 tasklist /fi "imagename eq nginx.exe",出现如下结果说明启动成功:
4.3 相关说明
- nginx 的配置文件是 conf 目录下的 nginx.conf
- 默认配置的 nginx 监听的端口为 80,如果 80 端口被占用可以修改为未被占用的端口
- 检查 80 端口是否被占用的命令是:
netstat -ano | findstr 0.0.0.0:80 - 当我们修改了 nginx 的配置文件 nginx.conf 时,不需要关闭 nginx 后重新启动,只需要执行命令
nginx -s reload即可让改动生效
五、配置 nginx.conf 文件
默认的 nginx.conf 文件并没有配置 RTMP 服务器,需要我们手动添加配置。具体步骤为:在 conf 目录中,复制粘贴 nginx.conf 文件并将其重命名为 nginx-win.conf,修改其内容为:
1 | #user nobody; |
这里监听端口未改动,仍然为 80,重点添加了 RTMP 服务器的相关配置,以搭建 RTMP 服务器,rtmp 协议的默认端口号是 1935。
六、标准 nginx 方式(失败)
按住 Windows 键 +R,输入 cmd,进入 cmd 命令窗口,进入 nginx 目录:cd E:\technology\nginx-1.17.9,然后启动 nginx rtmp 服务器:
1 | nginx.exe -c conf\nginx-win.conf |
6.1 错误信息
1 | nginx: [emerg] unknown directive "rtmp" in E:\technology\nginx-1.17.9/conf\nginx-win.conf:19 |
6.2 原因
nginx 的 windows 版本可能在编译的时候没有对 rtmp 模块进行编译导致使用不了。
6.3 解决方案
方法1:下载源码重新进行编译并把 rtmp 模块进行编译进去
过程较为繁琐,不推荐。有兴趣的可以参考:win7下nginx-rtmp-module的编译方法。
方法2:下载带 rtmp 模块的 nginx 版本,如 nginx 1.7.11.3 Gryphon
后续亲测可用。
七、nginx Gryphon 方式(成功)
7.1 下载 nginx 1.7.11.3 Gryphon
下载带 rtmp 模块的 nginx 版本,下载地址为:http://nginx-win.ecsds.eu/download/nginx
下载完成后解压,将解压后的目录名 nginx 1.7.11.3 Gryphon 改成 nginx-1.7.11.3-Gryphon
7.2 下载服务器状态检查程序
下载 nginx-rtmp-module,下载地址为:https://github.com/arut/nginx-rtmp-module
将 nginx-rtmp-module-master.zip 解压后复制到目录 nginx-1.7.11.3-Gryphon 下,保证 stat.xls 的目录为:nginx-1.7.11.3-Gryphon\nginx-rtmp-module\stat.xsl
7.3 配置文件
配置文件 conf\nginx-win.conf 与上面第 5 节一致
7.4 启动服务器
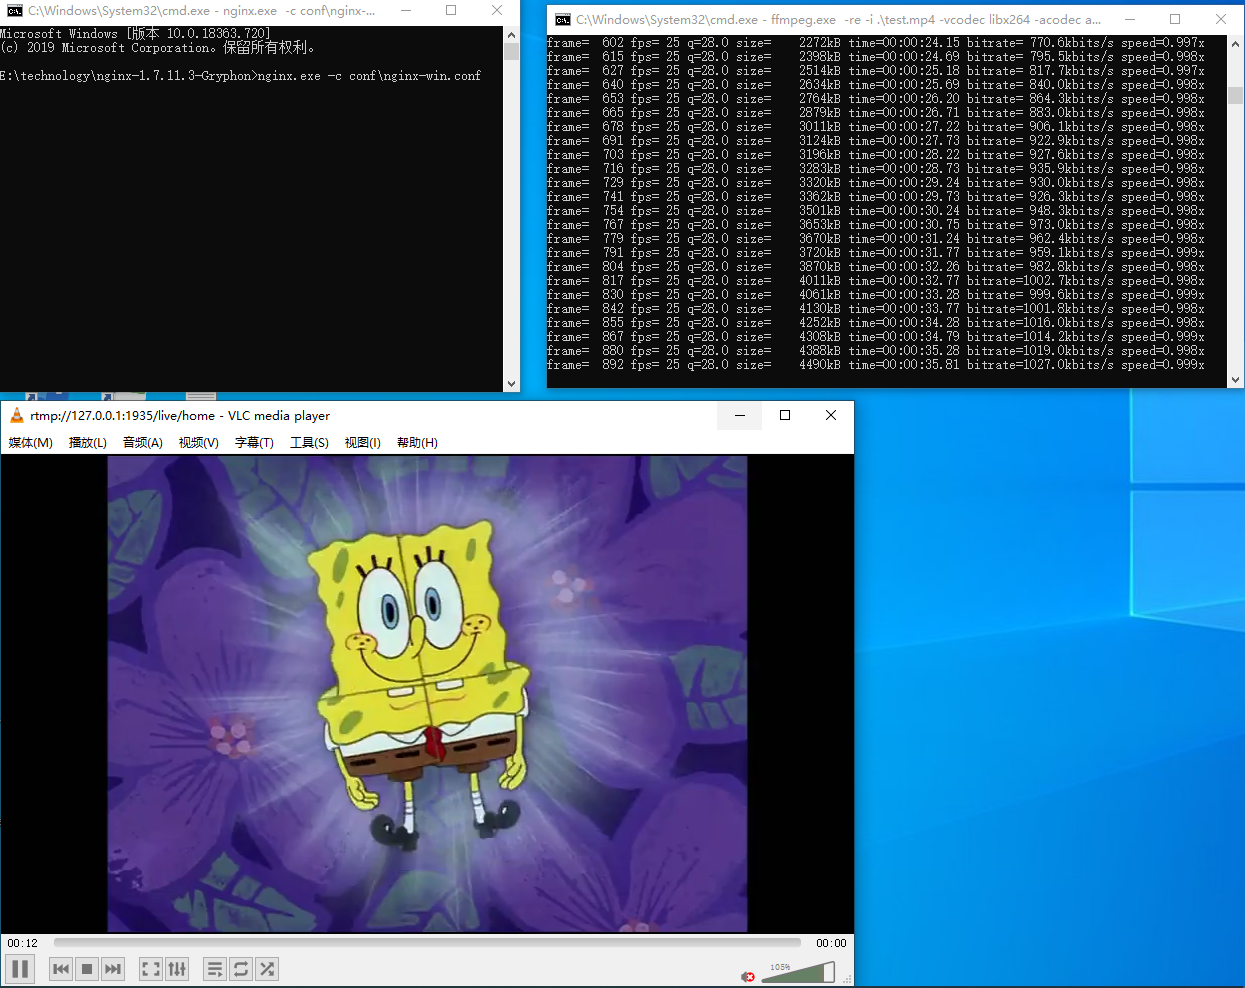
按住 Windows 键 +R,输入 cmd,进入 cmd 命令窗口,进入 nginx 目录:cd E:\technology\nginx-1.7.11.3-Gryphon,然后启动 nginx rtmp 服务器:
1 | nginx.exe -c conf\nginx-win.conf |
八、RTMP 推流测试
8.1 FFmpeg 本地视频推流
1 | ffmpeg.exe -re -i .\test.mp4 -vcodec libx264 -acodec aac -f flv rtmp://127.0.0.1:1935/live/home |
8.2 VLC 播放器拉流
使用 VLC 播放器测试,输入网络 URL:rtmp://127.0.0.1:1935/live/home
上面 IP 地址均可换成本地 IP
8.3 摄像头推流测试
1 | ffmpeg -f dshow -i video="FHD Camera" -vcodec libx264 -preset:v ultrafast -tune:v zerolatency -f flv rtmp://127.0.0.1:1935/live/home |
在设备管理器的”照相机”处,获得摄像头设备名称摄像头为”FHD Camera”。更多推流命令请参考:Windows 搭建 nginx rtmp服务器
九、关闭 nginx
如果使用 cmd 命令窗口启动 nginx,关闭 cmd 窗口是不能结束 nginx 进程的,可使用两种方法关闭 nginx:
(1)输入 nginx 命令:nginx -s stop(快速停止 nginx)或 nginx -s quit(完整有序的停止 nginx)
(2)使用 taskkill 命令:taskkill /f /t /im nginx.exe
十、Linux 平台搭建
10.1 安装 nginx(带 rtmp 模块)
1. 下载稳定版本的 nginx
下载地址:http://nginx.org
2. 下载 rtmp 模块
下载地址:https://github.com/arut/nginx-rtmp-module
1 | git clone https://github.com/arut/nginx-rtmp-module.git |
3. 解压并编译 nginx
解压 nginx 的 tar 包,确保 nginx 和 rtmp 模块在同一目录
1 | nginx-1.12.2 nginx-1.12.2.tar.gz nginx-rtmp-module |
进入 nginx 解压目录配置编译参数:
1 | ./configure --prefix=/usr/local/nginx --add-module=../nginx-rtmp-module --with-http_ssl_module |
4. 编译安装
1 | make && make install |
如果已安装 nginx 可以在已有 nginx 上面增加模块,参考:https://www.cnblogs.com/zhangmingda/p/12622590.html
10.2 nginx.conf 配置
1 | user nginx; |
十一、点播与直播功能
11.1 点播功能
1. 创建点播目录
1 | mkdir /usr/share/nginx/html/vod/flvs/ |
将 test.flv 视频文件存放到该目录
2. 使用 VLC 播放器播放
播放按钮可以输入 rtmp:// 的连接,步骤为:播放 > 播放 > 网络媒体
3. 移动端播放
安卓手机万能播放器:我的 > 连接播放 > 输入 url 即可播放
11.2 直播功能
1. 推流
电脑端 OBS 可以输入推流地址 rtmp://IP/live/test 进行推流,其中 live 为配置文件中定义的直播应用,test 为自定义流名称
2. 拉流
使用 VLC 播放器输入:rtmp://127.0.0.1/live/test
3. HLS 协议
- 推流:使用
rtmp://IP/应用名/流名称进行推流 - 拉流:支持 http 协议访问 hls 应用下流名称.m3u8 文件
1 | <html> |
十二、直播录制
12.1 flv.js 播放直播录制视频
1 |
|
十三、nginx-rtmp-module 指令详解
13.1 核心指令
| 指令 | 语法 | 上下文 | 说明 |
|---|---|---|---|
| rtmp | rtmp { ... } |
根 | 保存所有 RTMP 配置的块 |
| server | server { ... } |
rtmp | 声明一个 RTMP 实例 |
| listen | listen (addr[:port]|port|unix:path) [bind] |
server | 给 NGINX 添加一个监听端口以接收 RTMP 连接 |
| application | application name { ... } |
server | 创建一个 RTMP 应用 |
| timeout | timeout value |
rtmp, server | Socket 超时,默认值为 1 分钟 |
| ping | ping value |
rtmp, server | RTMP ping 间隔,默认值为一分钟 |
| chunk_size | chunk_size value |
rtmp, server, application | 流整合的最大块大小,默认值为 4096 |
13.2 直播相关指令
| 指令 | 说明 |
|---|---|
live on |
开启直播模式 |
meta on/off |
切换发送元数据到客户端,默认为 on |
interleave on/off |
切换交叉模式,音频和视频数据会在同一个 RTMP chunk 流中传输 |
wait_key on/off |
使视频流从一个关键帧开始 |
wait_video on/off |
在第一个视频帧发送之前禁用音频 |
publish_notify on/off |
发送 NetStream.Publish.Start 和 NetStream.Publish.Stop 给用户 |
sync timeout |
同步音频和视频流,默认值为 300 ms |
13.3 录制相关指令
| 指令 | 说明 |
|---|---|
record [off|all|audio|video|keyframes|manual] |
切换录制模式 |
record_path path |
指定录制的 flv 文件存放目录 |
record_suffix value |
设置录制文件后缀名,默认为 ‘.flv’ |
record_max_size size |
设置录制文件的最大值 |
record_max_frames nframes |
设置每个录制文件的视频帧的最大数量 |
record_interval time |
录制间隔 |
record_notify on/off |
录制状态通知 |
示例:
1 | recorder myrec { |
13.4 HLS 相关指令
| 指令 | 说明 |
|---|---|
hls on/off |
在 application 切换 HLS |
hls_path path |
设置 HLS 播放列表和分段目录 |
hls_fragment time |
设置 HLS 分段长度,默认为 5 秒钟 |
hls_playlist_length time |
设置 HLS 播放列表长度,默认为 30 秒钟 |
hls_continuous on/off |
切换 HLS 连续模式 |
hls_nested on/off |
切换 HLS 嵌套模式 |
hls_cleanup on/off |
切换 HLS 清理 |
13.5 访问控制
1 | # 允许/禁止发布 |
13.6 外部命令执行
定义每个流发布时要执行的带有参数的外部命令:
1 | exec ffmpeg -i rtmp://localhost/src/$name -vcodec libx264 -acodec aac -f flv rtmp://localhost/hls/$name; |
可用变量:
$name- 流的名字$app- 应用名$addr- 客户端地址$flashver- 客户端 flash 版本$swfurl- 客户端 swf url$tcurl- 客户端 tc url$pageurl- 客户端页面 url
13.7 回调函数
| 指令 | 说明 |
|---|---|
on_connect url |
设置 HTTP 连接回调 |
on_play url |
设置 HTTP 播放回调 |
on_publish url |
设置 HTTP 发布回调 |
on_done url |
设置播放/发布禁止回调 |
on_record_done url |
设置录制完成回调 |
on_update url |
设置 update 回调 |
13.8 Relay 相关指令
| 指令 | 说明 |
|---|---|
pull url [key=value]* |
创建 pull 中继,流将从远程服务器上拉下来 |
push url [key=value]* |
推送发布流到远程服务器 |
push_reconnect time |
push 重新连接前等待的时间,默认为 3 秒 |
session_relay on/off |
切换会话 relay 模式 |
13.9 其他指令
| 指令 | 说明 |
|---|---|
max_connections number |
为 rtmp 引擎设置最大连接数 |
rtmp_auto_push on/off |
切换自动推送(多 worker 直播流)模式 |
rtmp_control all |
设置 RTMP 控制程序 |