经过HelloWorld示例(Spring Boot 快速入门(上)HelloWorld示例)( Spring Boot 快速入门 详解 HelloWorld示例详解)两篇的学习和练习,相信你已经知道了Spring Boot是如此的简单,但又有不少疑惑,那么多注解如何记住,他的生态怎么样,缓存、NoSQL、定时器、邮件发送等细节功能如何处理。
如果你觉得一篇一篇看文章学习太耗时间,你看这篇就够啦,如果你觉得这篇太长,可以跳过本章看其他章节。
本章是一个文章发布管理系统综合示例,主要以操作数据库、集成权限为主功能来实现Spring Boot周边核心功能。主要包括了
本章实现的功能
1、实现Thymeleaf模板
2、实现Rest Api
3、实现基于Shiro的权限登录
4、实现基于Mybatis的增删改查
5、实现基于ehcache的缓存
6、实现日志输出
7、实现全局配置
同时本章也向读者提供如何设计一个系统的思路。
通常我们编写一个小系统需要
1、需求分析:这里简单描述要演练什么样的系统
2、系统设计:包括了数据库和程序分层设计
3、编码:这里指编码
4、测试:这里只包括单元测试
5、上线:这里指运行代码
本章以开发一个文章发布管理系统为假想的需求,涉及到的功能
1.有一个管理员可以登录系统发布文章
2.可以发布文章、编辑文字、删除文章
3.有一个文章列表
这是个典型的基于数据库驱动的信息系统,使用spring boot+mysql即可开发。
本章需要演练的内容,实际上是一个小型的信息管理系统(文章发布管理系统),有权限、有增删改查、有缓存、有日志、有数据库等。已经完全具备一个信息系统应有的功能。
针对此类演练的示例,我们也应该从标准的项目实战思维来演练,而不能上来就开始新建项目、贴代码等操作。
3.1 分层架构
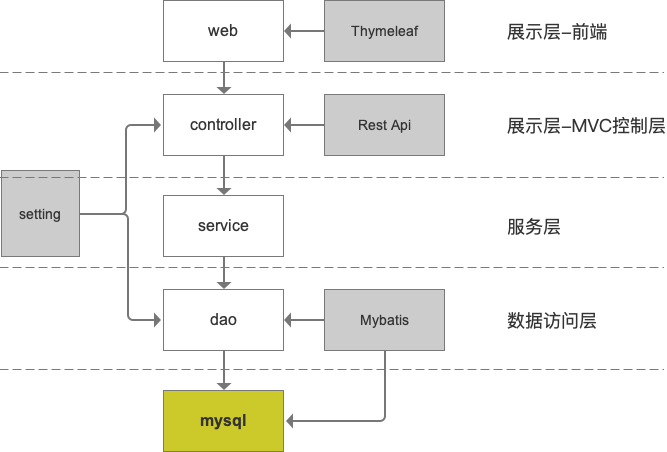
经典的三层、展示层、服务层、数据库访问层。
所以在项目结构中我们可以设计成
3.2 数据库设计
本次只是为了演示相关技术,所以采用单表设计,就设计一个t_article表,用户名与密码采用固定的。数据库设计尽量符合相关标准(本文中已小写下滑线来命名字段)
数据库 article
1)表 t_article设计

2)创建Table语句
1
2
3
4
5
6
7
8
9
10
11
12
13
14
15
16
17
18
SET NAMES utf8mb4;
SET FOREIGN_KEY_CHECKS = 0;
DROP TABLE IF EXISTS `t_article`;
CREATE TABLE `t_article` (
`id` int``(11) NOT NULL AUTO_INCREMENT,
`title` varchar``(255) NOT NULL``,
`content` varchar``(255) NOT NULL``,
`post_time` datetime NOT NULL``,
`post_status` int``(11) NOT NULL``,
`create_by` datetime NOT NULL``,
PRIMARY KEY (`id`)
) ENGINE=InnoDB DEFAULT CHARSET=utf8mb4;
SET FOREIGN_KEY_CHECKS = 1;
程序的编码应在整个设计中占到20%的工作量,有人说,那么那些复杂的业务、算法难道不花时间,复杂业务模型、复杂算法应该在系统设计阶段去作为关键技术去攻克。不要等到编码了,才去慢慢做。
编码与测试我们可以经历一些标准的路径。
1、创建项目,建立适合的项目目录
2、整合mybatis建立数据库访问层并测试
3、编写service服务层
4、编写应用层
5、整合thymeleaf编写前端
6、给系统加入Shiro权限认证
7、给系统加入logging日志
8、给系统加入缓存
9、给系统加入完整的测试代码
4.1 项目结构(复习使用IDEA创建项目)
4.1.1 使用IDEA创建项目
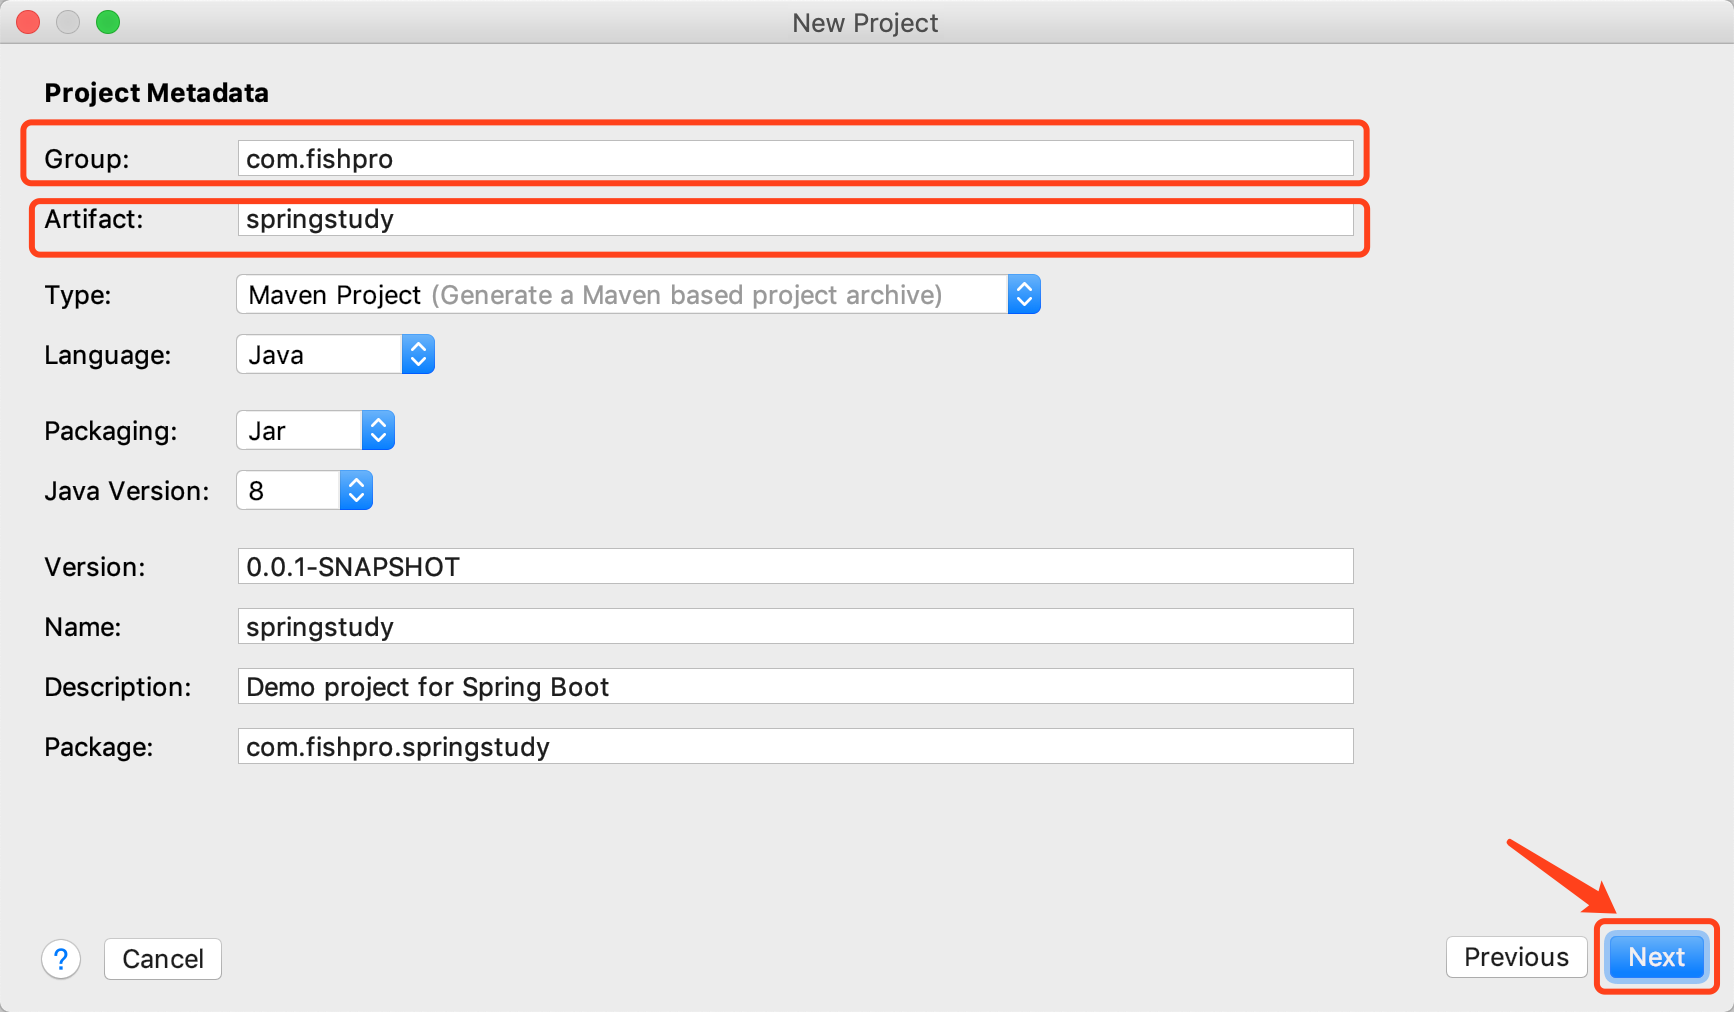
使用IDEA(本教程之后都使用IDEA来创建)创建名为 springstudy的项目
1)File>New>Project,如下图选择Spring Initializr 然后点击 【Next】下一步
2)填写GroupId(包名)、Artifact(项目名) ,本项目中 GroupId=com.fishpro Artiface=springstudy,这个步骤跟HelloWorld实例是一样的
3)选择依赖,我们选择Web
注:也可以使用HelloWorld示例项目,Copy一份,来做。
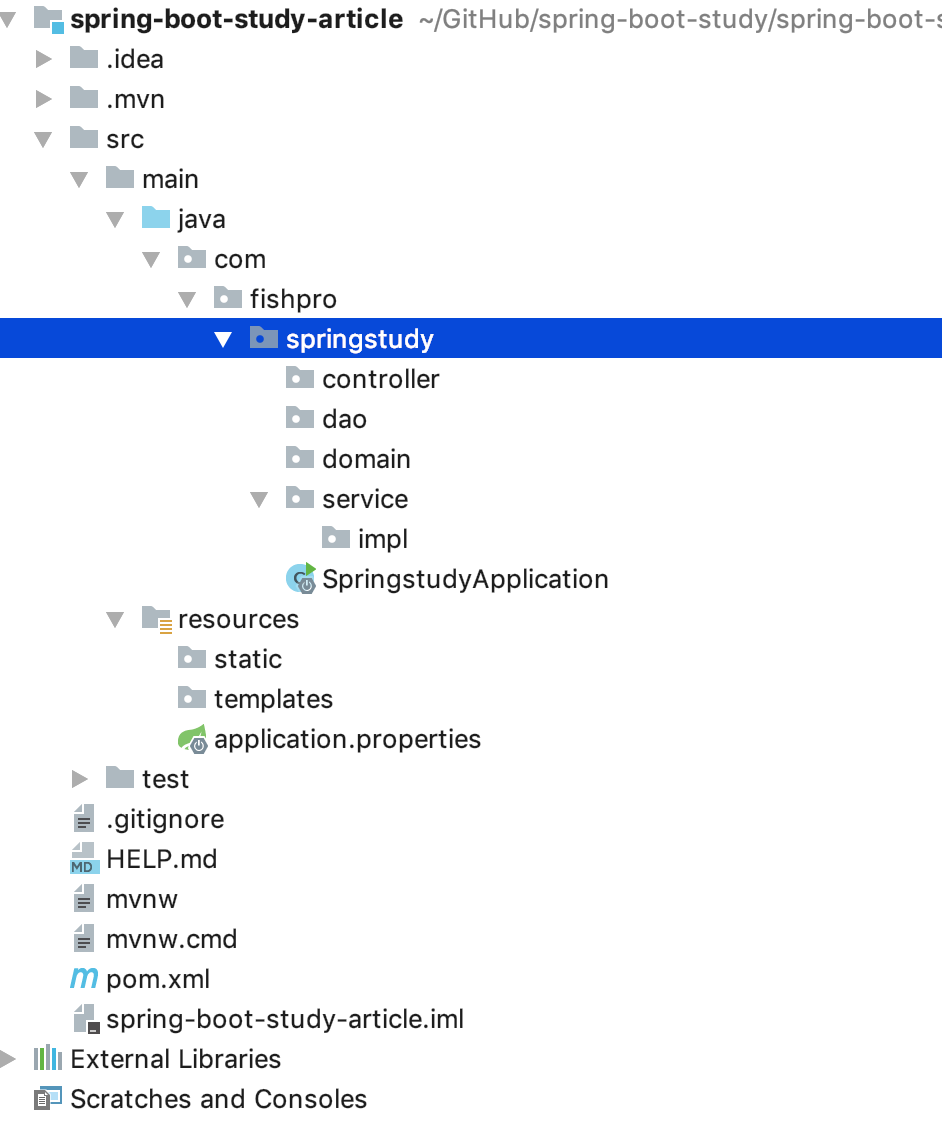
4.1.2 初始化项目结构
在springstudy包名下增加包名
1)controller mvc控制层
2)dao mybatis的数据库访问层
3)domain 实体类对应数据库字段
4)service 服务层
impl 服务实现
4.1.3 application.yml
个人习惯使用yml格式配置文件(缩进)
直接修改application.properties改为 application.yml
4.1.4 指定程序端口为8991
在application.yml中输入
4.2 增加Mybatis支持,编写数据库访问代码
4.2.1 编辑Pom.xml 增加依赖
本章使用mybatis和阿里巴巴的driud连接池来链接操作数据库
在pom.xml中增加依赖如下,注意有4个依赖引入,分别是mysql链接支持、jdbc支持、druid的alibaba连接池支持、mybatis支持。
1
2
3
4
5
6
7
8
9
10
11
12
13
14
15
16
17
18
19
20
21
22
<``dependency``>
<``groupId``>mysql</``groupId``>
<``artifactId``>mysql-connector-java</``artifactId``>
<``scope``>runtime</``scope``>
</``dependency``>
<``dependency``>
<``groupId``>org.springframework.boot</``groupId``>
<``artifactId``>spring-boot-starter-jdbc</``artifactId``>
</``dependency``>
<``dependency``>
<``groupId``>com.alibaba</``groupId``>
<``artifactId``>druid</``artifactId``>
<``version``>1.0.28</``version``>
</``dependency``>
<``dependency``>
<``groupId``>org.mybatis</``groupId``>
<``artifactId``>mybatis</``artifactId``>
<``version``>3.4.4</``version``>
</``dependency``>
如果依赖未自动导入,点击右下方 Import Changes 即可。
4.2.2 com.alibaba.druid连接池配置
(中文文档 https://github.com/alibaba/druid/wiki/%E5%B8%B8%E8%A7%81%E9%97%AE%E9%A2%98)
本章只是演练(配置、使用),不说明具体功能说明及配置含义。
1)在resouces\application.yml 配置Druid的应用程序配置
1
2
3
4
5
6
7
8
9
10
11
12
13
14
15
16
17
18
19
20
21
22
23
24
25
26
27
28
29
30
31
32
33
34
spring:
datasource:
type``: com.alibaba.druid.pool.DruidDataSource
driverClassName: com.mysql.jdbc.Driver
url: jdbc:mysql:``//localhost``:3306``/demo_article``?useSSL=``false``&useUnicode=``true``&characterEncoding=utf8
username: root
password: 123
initialSize: 1
minIdle: 3
maxActive: 20
maxWait: 60000
timeBetweenEvictionRunsMillis: 60000
minEvictableIdleTimeMillis: 30000
validationQuery: select 'x'
testWhileIdle: true
testOnBorrow: false
testOnReturn: false
poolPreparedStatements: true
maxPoolPreparedStatementPerConnectionSize: 20
filters: stat,wall,slf4j
connectionProperties: druid.stat.mergeSql=``true``;druid.stat.slowSqlMillis=5000
问题:com.mysql.jdbc.Driver 不能加载问题,因确认 mysql-connector-java 的依赖引入。
4.2.3 配置mybatis
在application.yml中增加
1
2
3
4
5
6
7
8
mybatis:
configuration:
map-underscore-to-camel-``case``: true
mapper-locations: mybatis/**/*Mapper.xml
typeAliasesPackage: com.fishpro.springstudy.**.domain
4.2.4 编写实体类domain.ArticleDO.java
1)在 com.fishpro.sprintstudy.domain包下新建java类 ArticleDO.java
2)编写代码如下(后期可以采用自动生成的方法)
1
2
3
4
5
6
7
8
9
10
11
12
13
14
15
16
17
18
19
20
21
22
23
24
25
26
27
28
29
30
31
32
33
34
35
36
37
38
39
40
41
42
43
44
45
46
47
48
49
50
51
52
53
54
55
56
57
58
59
60
61
package com.fishpro.springstudy.domain;
import java.util.Date;
public class ArticleDO {
private Integer id;
private String title;
private String content;
private Date postTime;
private Integer postStatus;
private Date createBy;
public Integer getId() {
return id;
}
public void setId(Integer id) {
this``.id = id;
}
public String getTitle() {
return title;
}
public void setTitle(String title) {
this``.title = title;
}
public String getContent() {
return content;
}
public void setContent(String content) {
this``.content = content;
}
public Date getPostTime() {
return postTime;
}
public void setPostTime(Date postTime) {
this``.postTime = postTime;
}
public Integer getPostStatus() {
return postStatus;
}
public void setPostStatus(Integer postStatus) {
this``.postStatus = postStatus;
}
public Date getCreateBy() {
return createBy;
}
public void setCreateBy(Date createBy) {
this``.createBy = createBy;
}
}
4.2.5 编写mybatis的mapper的xml
根据配置文件中的配置
#正则扫描mapper映射的位置
mapper-locations: mybatis/**/*Mapper.xml
我们在resources/下创建mybatis文件夹,并创建文件ArticleMapper.xml 包括了
1)获取单个实体
2)获取分页列表
3)插入
4)更新
5)删除
5)批量删除
1
2
3
4
5
6
7
8
9
10
11
12
13
14
15
16
17
18
19
20
21
22
23
24
25
26
27
28
29
30
31
32
33
34
35
36
37
38
39
40
41
42
43
44
45
46
47
48
49
50
51
52
53
54
55
56
57
58
59
60
61
62
63
64
65
66
67
68
69
70
71
72
73
74
75
76
77
78
79
80
81
82
83
84
85
86
87
<?``xml version="1.0" encoding="UTF-8"?>
<!``DOCTYPE mapper PUBLIC "-//mybatis.org//DTD Mapper 3.0//EN" "http://mybatis.org/dtd/mybatis-3-mapper.dtd">
<``mapper namespace="com.fishpro.springstudy.dao.ArticleDao">
<``select id="get" resultType="com.fishpro.springstudy.domain.ArticleDO">
select `id`,`title`,`content`,`post_time`,`post_status`,`create_by` from t_article where id = #{value}
</``select``>
<``select id="list" resultType="com.fishpro.springstudy.domain.ArticleDO">
select `id`,`title`,`content`,`post_time`,`post_status`,`create_by` from t_article
<``where``>
<``if test="id != null and id != '-1' " > and id = #{id} </``if``>
<``if test="title != null and title != '' " > and title = #{title} </``if``>
<``if test="content != null and content != '' " > and content = #{content} </``if``>
<``if test="postTime != null and postTime != '' " > and post_time = #{postTime} </``if``>
<``if test="postStatus != null and postStatus != '-1' " > and post_status = #{postStatus} </``if``>
<``if test="createBy != null and createBy != '' " > and create_by = #{createBy} </``if``>
</``where``>
<``choose``>
<``when test="sort != null and sort.trim() != ''">
order by ${sort} ${order}
</``when``>
<``otherwise``>
order by id desc
</``otherwise``>
</``choose``>
<``if test="offset != null and limit != null">
limit #{offset}, #{limit}
</``if``>
</``select``>
<``select id="count" resultType="int">
select count(*) from t_article
<``where``>
<``if test="id != null and id != '-1' " > and id = #{id} </``if``>
<``if test="title != null and title != '' " > and title = #{title} </``if``>
<``if test="content != null and content != '' " > and content = #{content} </``if``>
<``if test="postTime != null and postTime != '' " > and post_time = #{postTime} </``if``>
<``if test="postStatus != null and postStatus != '-1' " > and post_status = #{postStatus} </``if``>
<``if test="createBy != null and createBy != '' " > and create_by = #{createBy} </``if``>
</``where``>
</``select``>
<``insert id="save" parameterType="com.fishpro.springstudy.domain.ArticleDO" useGeneratedKeys="true" keyProperty="id">
insert into t_article
(
`title`,
`content`,
`post_time`,
`post_status`,
`create_by`
)
values
(
#{title},
#{content},
#{postTime},
#{postStatus},
#{createBy}
)
</``insert``>
<``update id="update" parameterType="com.fishpro.springstudy.domain.ArticleDO">
update t_article
<``set``>
<``if test="title != null">`title` = #{title}, </```if>`
<``if test="content != null">`content` = #{content}, </```if>`
<``if test="postTime != null">`post_time` = #{postTime}, </```if>`
<``if test="postStatus != null">`post_status` = #{postStatus}, </```if>`
<``if test="createBy != null">`create_by` = #{createBy}</```if>`
</``set``>
where id = #{id}
</``update``>
<``delete id="remove">
delete from t_article where id = #{value}
</``delete``>
<``delete id="batchRemove">
delete from t_article where id in
<``foreach item="id" collection="array" open="(" separator="," close=")">
#{id}
</``foreach``>
</``delete``>
</``mapper``>
4.2.6 编写dao
Dao是通过Mybats自动与Mapper对应的
1
2
3
4
5
6
7
8
9
10
11
12
13
14
15
16
17
18
19
20
21
22
23
24
25
26
package com.fishpro.springstudy.dao;
import com.fishpro.springstudy.domain.ArticleDO;
import java.util.List;
import java.util.Map;
import org.apache.ibatis.annotations.Mapper;
@Mapper
public interface ArticleDao {
ArticleDO get(Integer id);
List<ArticleDO> list(Map<String,Object> map);
int count(Map<String,Object> map);
int save(ArticleDO article);
int update(ArticleDO article);
int remove(Integer id);
int batchRemove(Integer[] ids);
}
注意:自此我们已经完成了实体类到具体数据库的映射操作,下面4.4.7编写一个controller类方法,直接测试。
4.2.7 编写一个RestController测试dao
虽然,原则上,我们需要建立service层,才能编写controller,现在我们不妨先测试下我们编写的Dao是否正确。
ArticleController.cs
1
2
3
4
5
6
7
8
9
10
11
12
13
14
15
16
17
18
19
20
21
22
23
24
25
26
27
28
29
30
31
32
33
package com.fishpro.springstudy.controller;
import com.fishpro.springstudy.dao.ArticleDao;
import com.fishpro.springstudy.domain.ArticleDO;
import org.springframework.beans.factory.annotation.Autowired;
import org.springframework.web.bind.annotation.RequestMapping;
import org.springframework.web.bind.annotation.RestController;
import java.util.Date;
@RequestMapping``(``"/article"``)
@RestController
public class ArtcileController {
@Autowired
private ArticleDao articleDao;
@RequestMapping``(``"/test"``)
public String test(){
ArticleDO articleDO=``new ArticleDO();
articleDO.setTitle(``"testing"``);
articleDO.setContent(``"content"``);
articleDO.setCreateBy(``new Date());
articleDO.setPostStatus(``0``);
articleDO.setPostTime(``new Date());
int i= articleDao.save(articleDO);
if``(i>``0``)
return "ok"``;
else
return "fail"``;
}
}
在浏览器输入 http://localhost:8991/article/test
如下图:是浏览器的截图和数据库插入的数据展示。

4.3 编写Service服务层代码
服务层代码通常分接口,和接口的实现,具体放在service和service.impl下;
在 com.fishpro.springstudy.service 下建立接口文件 ArticleService.java
在 com.fishpro.springstudy.service.impl下建立接口实现文件 ArticleServiceImpl.java
主要代码如下
ArticleService.java
1
2
3
4
5
6
7
8
9
10
public interface ArticleService {
ArticleDO get(Integer id);
List<ArticleDO> list(Map<String, Object> map);
int count(Map<String, Object> map);
int save(ArticleDO article);
int update(ArticleDO article);
int remove(Integer id);
int batchRemove(Integer[] ids);
}
ArticleServiceImpl.java
1
2
3
4
5
6
7
8
9
10
11
12
13
14
15
16
17
18
19
20
21
22
23
24
25
26
27
28
29
30
31
32
33
34
35
36
37
38
39
40
41
@Service
public class ArticleServiceImpl implements ArticleService {
@Autowired
private ArticleDao articleDao;
@Override
public ArticleDO get(Integer id){
return articleDao.get(id);
}
@Override
public List<ArticleDO> list(Map<String, Object> map){
return articleDao.list(map);
}
@Override
public int count(Map<String, Object> map){
return articleDao.count(map);
}
@Override
public int save(ArticleDO article){
return articleDao.save(article);
}
@Override
public int update(ArticleDO article){
return articleDao.update(article);
}
@Override
public int remove(Integer id){
return articleDao.remove(id);
}
@Override
public int batchRemove(Integer[] ids){
return articleDao.batchRemove(ids);
}
}
注意实现接口文件 ArticleServiceImpl.java 类中实现了注解 @Service
4.4 编写应用层代码
4.4.1 Rest Api简单实践
实际上在4.1最后,我们已经建立了一个Rest Api接口来测试。建立Rest Api在Spring Boot中非常简单
1)在controller包名下建立以Controller结尾的java文件,例如 ArticleController.cs
2)在类名上加入注解 @RestController 表示该类是Rest Api
在类名上加入 @RequestMapping 注解,表示该类的路由例如 @RequestMapping(“/article”)
3)编写public方法 例如 public String test(),在public方法上添加 @RequestMapping(“/test”) 表示该方法的路由是 test
例如4.1中
1
2
3
4
@RequestMapping``(``"/test"``)
public String test(){
return "test"``;
}
4)Get还是Post等方法
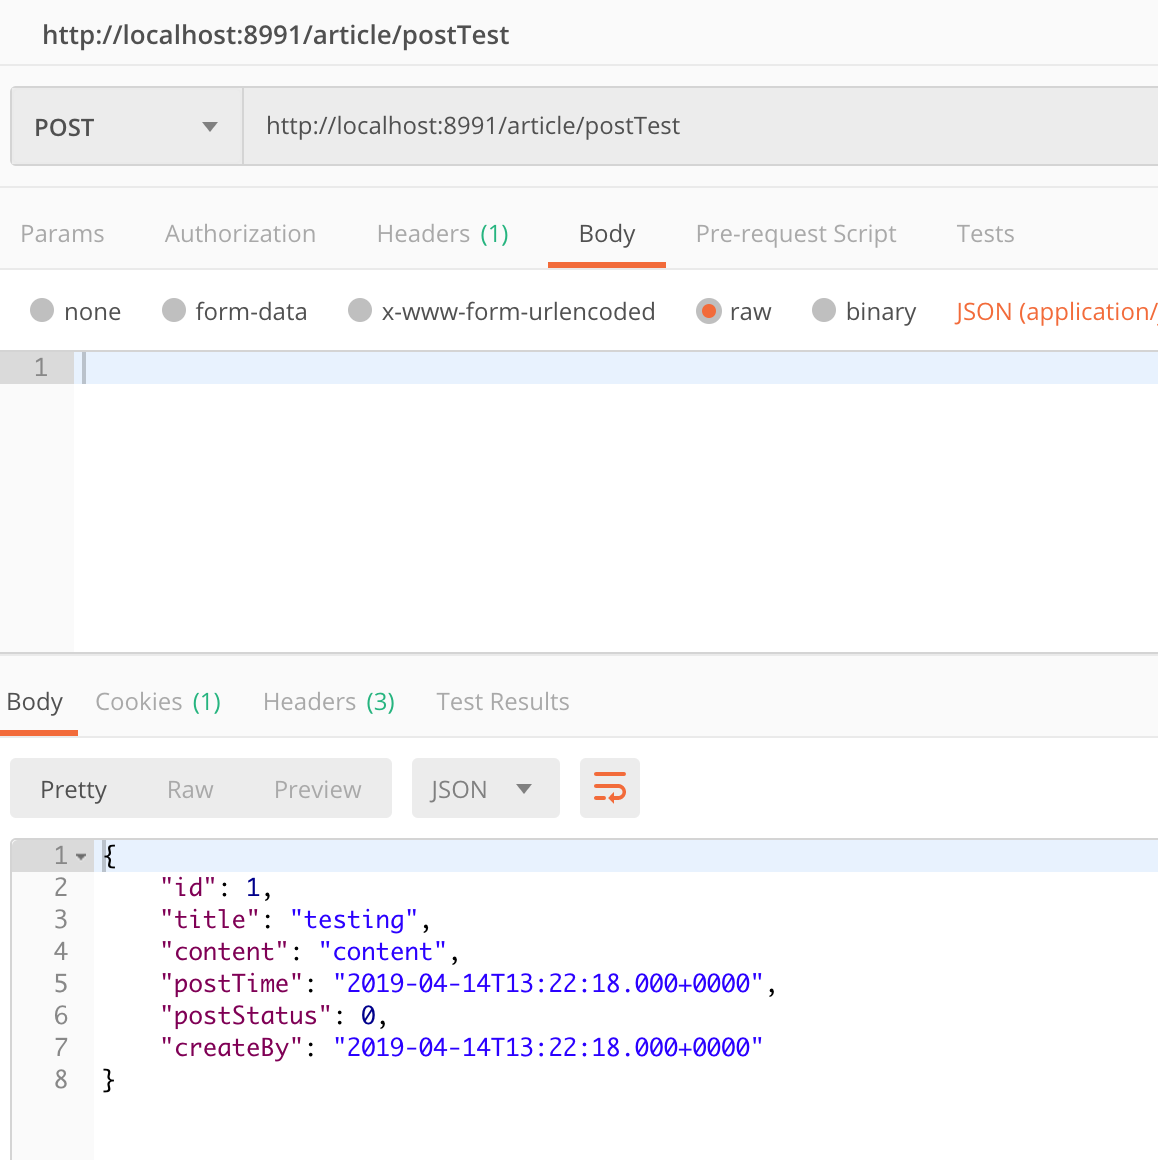
Post 在方法上加入@PostMapping(“/postTest”) 和 @ResponseBody (表示返回JSON格式)注解
1
2
3
4
5
6
@PostMapping``(``"/postTest"``)
@ResponseBody
public ArticleDO postTest(){
ArticleDO model=articleDao.get(``1``);
return model;
}
在Postman(谷歌下载)http://localhost:8991/article/postTest 如下图:
Get 在方法上加入 @GetMapping
5)参数的注解
HttpServletRequest
通常我们web方法的参数是HttpServletRequest,我们也可以在方法参数中设置HttpServletRequest参数,如下
1
2
3
4
5
6
7
@GetMapping``(``"/paramTest"``)
public String paramTest(HttpServletRequest request){
if``(request.getParameter(``"d"``)!=``null``)
return request.getParameter(``"d"``).toString();
else
return "not find param name d"``;
}
1)当我们输入 http://localhost:8991/article/paramTest 显示 “not find param name d”
2)当我输入http://localhost:8991/article/paramTest?d=i%20am%20d 显示 i am d
@RequestParam 替换 HttpServletRequest 的 request.getParameter方法
1
2
3
4
5
6
7
@GetMapping``(``"/paramNameTest"``)
public String paramNameTest(HttpServletRequest request,``@RequestParam``(``"name"``) String name){
if``(!``""``.equals(name))
return name;
else
return "not find param name "``;
}
@PathVariable 参数在路由中显示
1
2
3
4
5
6
7
@GetMapping``(``"/paramPathTest/{name}"``)
public String paramPathTest(HttpServletRequest request,``@PathVariable``(``"name"``) String name){
if``(request.getParameter(``"d"``)!=``null``)
return request.getParameter(``"d"``).toString();
else
return "not find param name d"``;
}
@RequestBody 参数为Json
1
2
3
4
5
@PostMapping``(``"/jsonPostJsonTest"``)
@ResponseBody
public ArticleDO jsonPostJsonTest(``@RequestBody ArticleDO articleDO){
return articleDO;
}
4.4.2 编写文章的新增、编辑、删除、获取列表等Controller层代码
为了统一管理返回状态,我们定义个返回的基础信息包括返回的代码、信息等信息 如下,表示统一使用Json作为返回信息
1
{``"code"``:``1``,``"msg"``:``"返回信息"``,``"data"``:Object}
对应的返回类
com.fishpro.springstudy.domain.Rsp.java
1
2
3
4
5
6
7
8
9
10
11
12
13
14
15
16
17
18
19
20
21
22
23
24
25
26
27
28
29
30
31
32
33
34
35
36
37
38
39
40
41
42
43
44
45
46
47
48
49
public class Rsp extends HashMap<String ,Object> {
private static final long serialVersionUID = 1L;
public Rsp() {
put(``"code"``, 0``);
put(``"msg"``, "操作成功"``);
}
public static Rsp error() {
return error(``1``, "操作失败"``);
}
public static Rsp error(String msg) {
return error(``500``, msg);
}
public static Rsp error(``int code, String msg) {
Rsp r = new Rsp();
if``(msg==``null``)
{
msg=``"发生错误"``;
}
r.put(``"code"``, code);
r.put(``"msg"``, msg);
return r;
}
public static Rsp ok(String msg) {
Rsp r = new Rsp();
r.put(``"msg"``, msg);
return r;
}
public static Rsp ok(Map<String, Object> map) {
Rsp r = new Rsp();
r.putAll(map);
return r;
}
public static Rsp ok() {
return new Rsp();
}
@Override
public Rsp put(String key, Object value) {
super``.put(key, value);
return this``;
}
}
在ArticleController.java里面,我们编写 相关的方法,全部的java代码如下:
注意:这里我们不研究分页的方法(后面讲)。
1
2
3
4
5
6
7
8
9
10
11
12
13
14
15
16
17
18
19
20
21
22
23
24
25
26
27
28
29
30
31
32
33
34
35
36
37
38
39
40
41
42
43
44
45
46
47
48
49
50
51
52
53
54
55
56
57
58
59
60
61
62
63
64
65
66
67
68
69
70
71
72
73
74
75
76
77
78
79
80
/**
* 文章首页 存放列表页面
* */
@GetMapping``()
String Article(){
return "article/index"``;
}
/**
* 获取文章列表数据 不考虑分页
* */
@ResponseBody
@GetMapping``(``"/list"``)
public List<ArticleDO> list(``@RequestParam Map<String, Object> params){
List<ArticleDO> articleList = articleService.list(params);
return articleList;
}
/**
* 文章添加页面的路由
* */
@GetMapping``(``"/add"``)
String add(){
return "article/add"``;
}
/**
* 文章编辑页面的路由
* */
@GetMapping``(``"/edit/{id}"``)
String edit(``@PathVariable``(``"id"``) Integer id,Model model){
ArticleDO article = articleService.get(id);
model.addAttribute(``"article"``, article);
return "article/edit"``;
}
/**
* Post方法,保存数据 这里不考虑权限
*/
@ResponseBody
@PostMapping``(``"/save"``)
public Rsp save(ArticleDO article){
if``(articleService.save(article)>``0``){
return Rsp.ok();
}
return Rsp.error();
}
/**
* Post方法,修改数据 这里不考虑权限
*/
@ResponseBody
@RequestMapping``(``"/update"``)
public Rsp update( ArticleDO article){
articleService.update(article);
return Rsp.ok();
}
/**
* Post方法,删除数据 这里不考虑权限
*/
@PostMapping``( "/remove"``)
@ResponseBody
public Rsp remove( Integer id){
if``(articleService.remove(id)>``0``){
return Rsp.ok();
}
return Rsp.error();
}
/**
* Post方法,批量删除数据 这里不考虑权限
*/
@PostMapping``( "/batchRemove"``)
@ResponseBody
public Rsp remove(``@RequestParam``(``"ids[]"``) Integer[] ids){
articleService.batchRemove(ids);
return Rsp.ok();
}
说明:
Article方法 对应 /article/index地址 对应html文件为 resources/templates/article/index.html
add方法对应 /article/add 对应html文件为 resources/templates/article/add.html
edit方法对应 /article/edit 对应html文件为 resources/templates/article/edit.html
4.5 使用Thymeleaf编写前端页面
Thymeleaf是一套Java开发的独立的模板引擎,可以很好与Spring Boot整合,起到事半功倍的效果。
使用Thymeleaf前,我们需要知道
/resources/static 是存放静态文件 包括image css js等
/resources/templates 是存放模板文件
4.5.1 Pom.xml中添加依赖
1
2
3
4
5
6
7
8
9
10
<``dependency``>
<``groupId``>org.springframework.boot</``groupId``>
<``artifactId``>spring-boot-starter-thymeleaf</``artifactId``>
</``dependency``>
<``dependency``>
<``groupId``>net.sourceforge.nekohtml</``groupId``>
<``artifactId``>nekohtml</``artifactId``>
</``dependency``>
4.5.2 配置Thymeleaf
编辑 application.yml
1
2
3
4
5
spring:
thymeleaf:
mode: LEGACYHTML5
cache: false
prefix: classpath:``/templates/
4.5.3 使用Thymeleaf
thymeleaf可以直接使用html后缀,在resources/templates下增加,在本章示例中
resources/templates/article/index.html
resources/templates/article/add.html
resources/templates/article/edit.html
为了快速的开发实例,我们使用前端框架H+作为练习使用。
前端使用jquery、bootstrap.css、bootstrap-table.js
4.5.4 文章列表页面
列表页面主要采用bootstrap-table.js插件。
bootstrap-table.js
因为数据少,我们之间采用客户端分页的模式 sidePagination : “client”, // 设置在哪里进行分页,可选值为”client” 或者 “server”
1)建立模板页面: resources/templates/article/index.html
2 建立路由:在ArticleController中增加前端页面路由/article/index
3) 建立数据路由:ArticleController中编写bootstrap-table的ajax请求方法 list
4)运行:在浏览器中验证
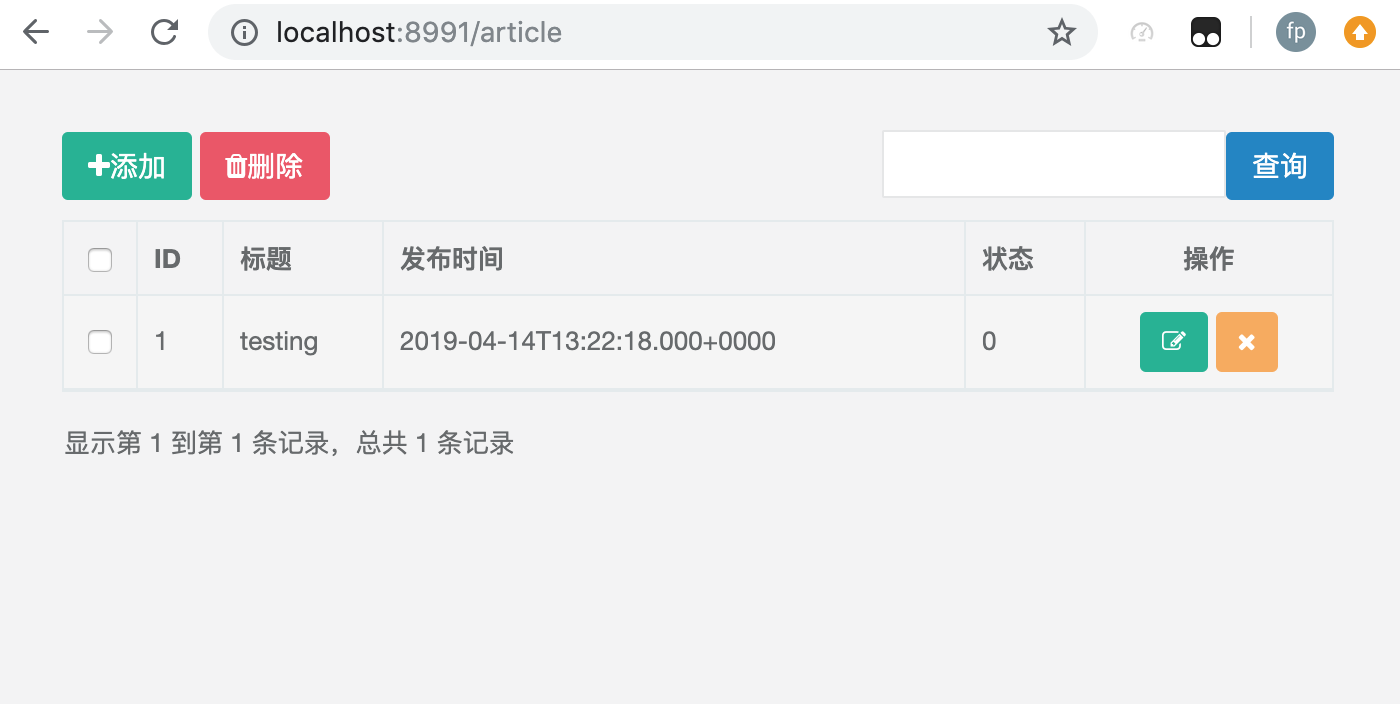
注意:本页面没有用到thymeleaf的模板语句。
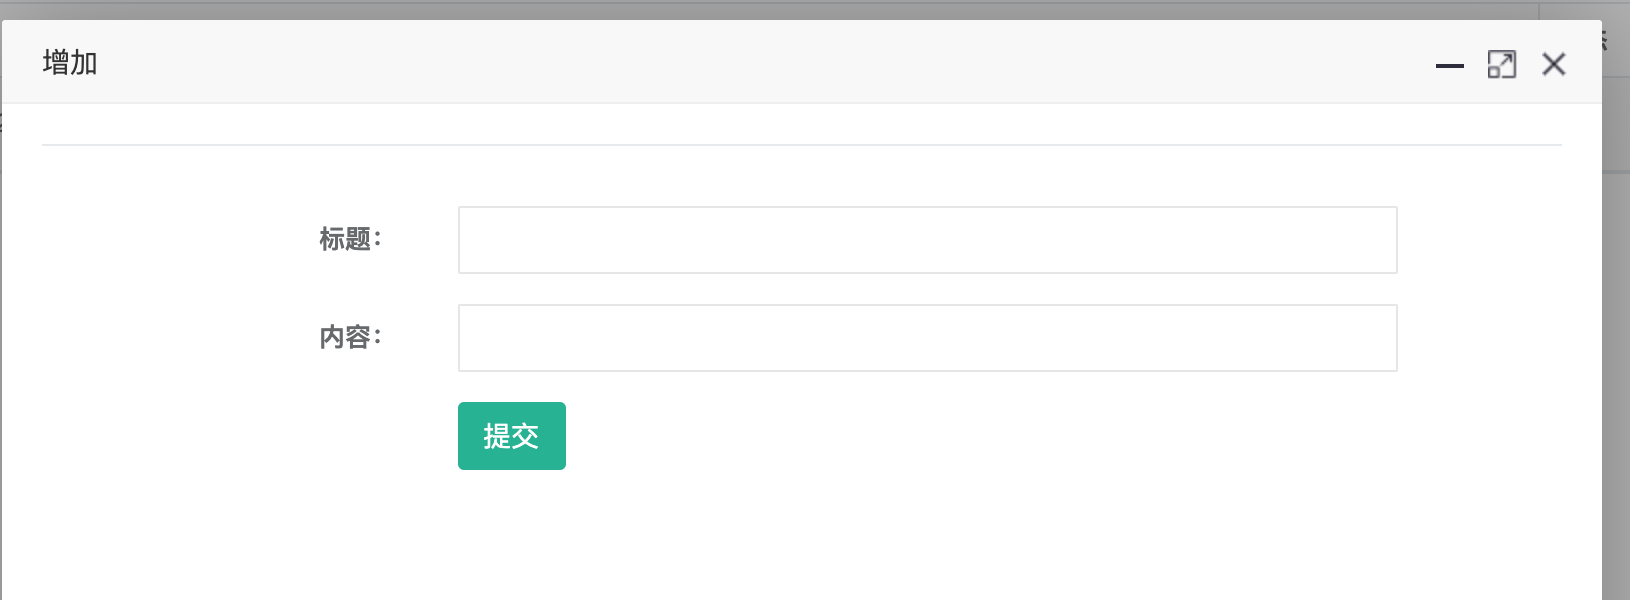
4.5.5 添加文章功能
注意,我们使用了layui的弹窗组件。
1)建立模板页面: resources/templates/article/add.html
2 建立路由:在ArticleController中增加前端页面路由/article/
3) 建立数据路由:ArticleController中编写bootstrap-table的ajax请求方法 save
4)运行:编写页面的ajax方法,在浏览器中验证
保存新增数据代码
1
2
3
4
5
6
7
8
9
10
11
12
13
14
15
16
17
18
19
20
21
22
23
24
function save() {
$.ajax({
cache : true``,
type : "POST"``,
url : "/article/save"``,
data : $(``'#signupForm'``).serialize(),
async : false``,
error : function``(request) {
parent.layer.alert(``"Connection error"``);
},
success : function``(data) {
if (data.code == 0) {
parent.layer.msg(``"操作成功"``);
parent.reLoad();
var index = parent.layer.getFrameIndex(window.name);
parent.layer.close(index);
} else {
parent.layer.alert(data.msg)
}
}
});
}
注意:本页面没有用到thymeleaf的模板语句。
4.5.6 修改文章功能
1)建立模板页面: resources/templates/article/edit.html
2 建立路由:在ArticleController中增加前端页面路由/article/edit,并配置模板页面,如下代码,其中thymeleaf标签规则为
a.th开头
b.等于号后面是 “${ }” 标签,在${ } 大括号内存放后台的model数据和数据的逻辑。如${article.title}表示后台的article对象中的title值
c.关于thymeleaf这里不做细化,后面单独实践。
1
2
3
4
5
6
7
8
9
10
11
12
13
14
15
16
17
18
19
20
21
22
23
24
25
26
<``form class="form-horizontal m-t" id="signupForm">
<``input id="id" name="id" th:value="${article.id}" type="hidden">
<``div class="form-group">
<``label class="col-sm-3 control-label">:</``label``>
<``div class="col-sm-8">
<``input id="title" name="title" th:value="${article.title}" class="form-control" type="text">
</``div``>
</``div``>
<``div class="form-group">
<``label class="col-sm-3 control-label">:</``label``>
<``div class="col-sm-8">
<``input id="content" name="content" th:value="${article.content}" class="form-control" type="text">
</``div``>
</``div``>
<``div class="form-group">
<``label class="col-sm-3 control-label">:</``label``>
<``div class="col-sm-8">
<``input id="postStatus" name="postStatus" th:value="${article.postStatus}" class="form-control" type="text">
</``div``>
</``div``>
<``div class="form-group">
<``div class="col-sm-8 col-sm-offset-3">
<``button type="submit" class="btn btn-primary">提交</``button``>
</``div``>
</``div``>
</``form``>
3) 建立数据路由:ArticleController中编写bootstrap-table的ajax请求方法 update
4)运行:编写页面的ajax方法,在浏览器中验证
1
2
3
4
5
6
7
8
9
10
11
12
13
14
15
16
17
18
19
20
21
22
23
24
function update() {
$.ajax({
cache : true``,
type : "POST"``,
url : "/article/update"``,
data : $(``'#signupForm'``).serialize(),
async : false``,
error : function``(request) {
parent.layer.alert(``"Connection error"``);
},
success : function``(data) {
if (data.code == 0) {
parent.layer.msg(``"操作成功"``);
parent.reLoad();
var index = parent.layer.getFrameIndex(window.name);
parent.layer.close(index);
} else {
parent.layer.alert(data.msg)
}
}
});
}
4.5.7 删除文章功能
因为删除不需要单独编写界面,流程与新增、编辑都不一样,删除直接在列表页面进行触发。
1) 建立数据路由:ArticleController中编写bootstrap-table的ajax请求方法 remove
2)运行:编写页面的ajax方法,在浏览器中验证
1
2
3
4
5
6
7
8
9
10
11
12
13
14
15
16
17
18
19
20
21
function remove(id) {
layer.confirm(``'确定要删除选中的记录?'``, {
btn : [ '确定'``, '取消' ]
}, function``() {
$.ajax({
url : prefix+``"/remove"``,
type : "post"``,
data : {
'id' : id
},
success : function``(r) {
if (r.code==0) {
layer.msg(r.msg);
reLoad();
}``else``{
layer.msg(r.msg);
}
}
});
})
}
总结:编写代码工作实际上是枯燥无味的,实际上面的,三层结构代码是可以全部自动生成的,没有必要手动来编写,只不过,在这里,拿出来讲解说明部分原理。
4.6 使用Shiro加入权限认证
如何对4.5的功能加入权限认证,这样,其他人就不能随便使用这些具有危险操作的功能。
在Spring Boot中已经支持了很多权限认证套件,比如Shiro 比如Spring Boot Security,本章实践使用Shiro,他简单而强大,非常适合中后端开发者使用。
Shiro对于使用者来说,虽然简单易于使用,但是里面的各种流程,我到现在还是不求甚解。
4.6.1 Shiro简单说明
有必要简单了解下这个认证框架,采用官方的图片说明

1) Authentication:身份认证/登录,验证用户是不是拥有相应的身份;
2)Authorization:授权,即权限验证,验证某个已认证的用户是否拥有某个权限;即判断用户是否能做事情,常见的如:验证某个用户是否拥有某个角色。或者细粒度的验证某个用户对某个资源是否具有某个权限;
3)Session Manager:会话管理,即用户登录后就是一次会话,在没有退出之前,它的所有信息都在会话中;会话可以是普通JavaSE环境的,也可以是如Web环境的;
4)Cryptography:加密,保护数据的安全性,如密码加密存储到数据库,而不是明文存储;
这里需要说明的是 Authentication 和 Authorization 看起来是差不多,实 Authentication 是身份证认证,你去公园,进大门就要验票,就是这个。Authorization 是授权,就是你去里面玩,你到了某个景点,还要验证下你是否被授权访问,就是这个Authorization
其他几个说明
5)Web Support:Web支持,可以非常容易的集成到Web环境;
6)Caching:缓存,比如用户登录后,其用户信息、拥有的角色/权限不必每次去查,这样可以提高效率;
7)Concurrency:shiro支持多线程应用的并发验证,即如在一个线程中开启另一个线程,能把权限自动传播过去;
8)Testing:提供测试支持;
9)Run As:允许一个用户假装为另一个用户(如果他们允许)的身份进行访问;
10)Remember Me:记住我,这个是非常常见的功能,即一次登录后,下次再来的话不用登录了。
那么Shiro是如何实现一个认证,又是如何实现一个授权的呢?
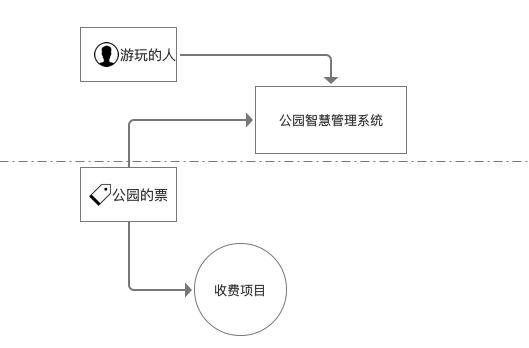
这里涉及到几个概念

1)Subject:当前用户,Subject 可以是一个人,但也可以是第三方服务、守护进程帐户、时钟守护任务或者其它–当前和软件交互的任何事件。
解读:你去公园,Subject就是你(人)
2)SecurityManager:管理所有Subject,SecurityManager 是 Shiro 架构的核心,配合内部安全组件共同组成安全伞。
解读:SecurityManager就是公园的门票管理系统(包括了闸机、后台服务等)
3)Realms:用于进行权限信息的验证,我们自己实现。Realm 本质上是一个特定的安全 DAO:它封装与数据源连接的细节,得到Shiro 所需的相关的数据。在配置 Shiro 的时候,你必须指定至少一个Realm 来实现认证(authentication)和/或授权(authorization)。
解读:就是你拿的票,你可以买一个大的门票,也可以买包含特殊项目的门票。不同的门票对应不同的授权。
下面我实际操作如何整合Shiro
4.6.2 Pom中加入Shiro依赖
如下代码:注意这里加入了ehcache、shiro、shiro for spring、shiro ehcache、shiro thymeleaf(与thymeleaf完美结合)
1
2
3
4
5
6
7
8
9
10
11
12
13
14
15
16
17
18
19
20
21
22
23
24
25
26
27
28
29
30
31
<``dependency``>
<``groupId``>org.springframework.boot</``groupId``>
<``artifactId``>spring-boot-starter-cache</``artifactId``>
</``dependency``>
<``dependency``>
<``groupId``>net.sf.ehcache</``groupId``>
<``artifactId``>ehcache</``artifactId``>
</``dependency``>
<``dependency``>
<``groupId``>org.apache.shiro</``groupId``>
<``artifactId``>shiro-core</``artifactId``>
<``version``>1.3.2</``version``>
</``dependency``>
<``dependency``>
<``groupId``>org.apache.shiro</``groupId``>
<``artifactId``>shiro-spring</``artifactId``>
<``version``>1.3.2</``version``>
</``dependency``>
<``dependency``>
<``groupId``>org.apache.shiro</``groupId``>
<``artifactId``>shiro-ehcache</``artifactId``>
<``version``>1.3.2</``version``>
</``dependency``>
<``dependency``>
<``groupId``>com.github.theborakompanioni</``groupId``>
<``artifactId``>thymeleaf-extras-shiro</``artifactId``>
<``version``>1.2.1</``version``>
</``dependency``>
ehcache配置
ehcache 需要在resources下新建config文件夹,并新建ehcache.xml文配置文件
1
2
3
4
5
6
7
8
9
10
11
12
<?``xml version="1.0" encoding="UTF-8"?>
<``ehcache xmlns:xsi="http://www.w3.org/2001/XMLSchema-instance"
xsi:noNamespaceSchemaLocation="http://ehcache.org/ehcache.xsd"
updateCheck="false">
<``diskStore path="java.io.tmpdir/Tmp_EhCache" />
<``defaultCache eternal="false" maxElementsInMemory="1000"
overflowToDisk="false" diskPersistent="false" timeToIdleSeconds="0"
timeToLiveSeconds="600" memoryStoreEvictionPolicy="LRU" />
<``cache name="role" eternal="false" maxElementsInMemory="10000"
overflowToDisk="false" diskPersistent="false" timeToIdleSeconds="0"
timeToLiveSeconds="0" memoryStoreEvictionPolicy="LFU" />
</``ehcache``>
4.6.3 在Spring Boot中编写Shiro配置
根据4.6.1简要说明,如下图,我们需要使用Shiro就必须要先创建Shiro SecurityManager,
而创建SecurityManager,的过程就是包括设置Realm。
在Realm中,我们继承两个接口,一个是认证、一个是授权。
1) 增加包名 springstudy.config
2)在springstudy.config增加shiro包名,并增加UserRealm.java 表示Shiro权限认证中的用户票据(门票)。代码如下,我们假设了用户admin密码1234569,拥有一些权限。
1
2
3
4
5
6
7
8
9
10
11
12
13
14
15
16
17
18
19
20
21
22
23
24
25
26
27
28
29
30
31
32
33
34
35
36
37
38
39
40
41
42
43
44
45
46
/**
* 授权 假设
* system:article:index 列表
* system:article:add 增加权限
* system:article:edit 修改权限
* system:article:remove 删除权限
* system:article:batchRemove 批量删除权限
* */
@Override
protected AuthorizationInfo doGetAuthorizationInfo(PrincipalCollection principalCollection) {
Long userId= ShiroUtils.getUserId();
Set<String> permissions=``new HashSet<>();
permissions.add(``"system:article:index"``);
permissions.add(``"system:article:add"``);
permissions.add(``"system:article:edit"``);
permissions.add(``"system:article:remove"``);
permissions.add(``"system:article:batchRemove"``);
SimpleAuthorizationInfo info = new SimpleAuthorizationInfo();
info.setStringPermissions(permissions);
return info;
}
/**
* 认证 给出一个假设的admin用户
* */
@Override
protected AuthenticationInfo doGetAuthenticationInfo(AuthenticationToken authenticationToken) throws AuthenticationException {
String username=(String)authenticationToken.getPrincipal();
Map<String ,Object> map=``new HashMap<>(``16``);
map.put(``"username"``,username);
String password =``new String((``char``[]) authenticationToken.getCredentials());
if``(!``"admin"``.equals(username) || !``"1234569"``.equals(password)){
throw new IncorrectCredentialsException(``"账号或密码不正确"``);
}
UserDO user=``new UserDO();
user.setId(1L);
user.setUsername(username);
user.setPassword(password);
SimpleAuthenticationInfo info = new SimpleAuthenticationInfo(user, password, getName());
return info;
}
3)在shiro包名下,新建一个ShiroUtils.java的类,作为公用的类
1
2
3
4
5
6
7
8
9
10
11
12
13
14
15
16
17
18
19
20
21
22
23
24
25
@Autowired
private static SessionDAO sessionDAO;
public static Subject getSubjct() {
return SecurityUtils.getSubject();
}
public static UserDO getUser() {
Object object = getSubjct().getPrincipal();
UserDO userDO=``new UserDO();
return (UserDO)object;
}
public static Long getUserId() {
return getUser().getId();
}
public static void logout() {
getSubjct().logout();
}
public static List<Principal> getPrinciples() {
List<Principal> principals = null``;
Collection<Session> sessions = sessionDAO.getActiveSessions();
return principals;
}
4)在shiro包名下新建BDSessionListener.java,实现 SessionListener接口
1
2
3
4
5
6
7
8
9
10
11
12
13
14
15
16
17
18
19
20
21
private final AtomicInteger sessionCount = new AtomicInteger(``0``);
@Override
public void onStart(Session session) {
sessionCount.incrementAndGet();
}
@Override
public void onStop(Session session) {
sessionCount.decrementAndGet();
}
@Override
public void onExpiration(Session session) {
sessionCount.decrementAndGet();
}
public int getSessionCount() {
return sessionCount.get();
}
5)在1)中的包名 config下增加类ShiroConfig.java
详细代码见 源码下载
1
2
3
4
5
6
7
8
9
10
11
12
13
14
15
16
17
18
19
20
21
22
23
24
25
26
27
28
/**
* shiroFilterFactoryBean 实现过滤器过滤
* setFilterChainDefinitionMap 表示设置可以访问或禁止访问目录
* @param securityManager 安全管理器
* */
@Bean
ShiroFilterFactoryBean shiroFilterFactoryBean(SecurityManager securityManager) {
ShiroFilterFactoryBean shiroFilterFactoryBean = new ShiroFilterFactoryBean();
shiroFilterFactoryBean.setSecurityManager(securityManager);
shiroFilterFactoryBean.setLoginUrl(``"/login"``);
shiroFilterFactoryBean.setSuccessUrl(``"/article/index"``);
shiroFilterFactoryBean.setUnauthorizedUrl(``"/403"``);
LinkedHashMap<String, String> filterChainDefinitionMap = new LinkedHashMap<>();
filterChainDefinitionMap.put(``"/fonts/**"``, "anon"``);
filterChainDefinitionMap.put(``"/css/**"``, "anon"``);
filterChainDefinitionMap.put(``"/js/**"``, "anon"``);
filterChainDefinitionMap.put(``"/index"``, "anon"``);
filterChainDefinitionMap.put(``"/**"``, "authc"``);
shiroFilterFactoryBean.setFilterChainDefinitionMap(filterChainDefinitionMap);
return shiroFilterFactoryBean;
}
6)运行 http://localhost:8991//index
可以看到,跳转到http://localhost:8991/login

4.6.4 增加用户登录模块
在4.6.3中,在shiro过滤器中,我们默认login是可以访问的,其他都不能访问,用户必须经过shiro进行认真后,才能登录访问其他页面。
1)在resources/templates 下新建 login.html
2)实现html5代码
- 新增LoginController.java(在controller包名下)
1
2
3
4
@GetMapping``(``"/login"``)
public String login(){
return "/login"``;
}<br><br>
/**
* 登录按钮对应的 服务端api
* @param username 用户名
* @param password 用户密码
* @return Rsp 返回成功或失败 Json格式
* */
@ResponseBody
@PostMapping(“/login”)
public Rsp ajaxLogin(@RequestParam String username, @RequestParam String password){
UsernamePasswordToken token = new UsernamePasswordToken(username,password);
Subject subject = SecurityUtils.getSubject();
try{
    subject.login(token);
    return Rsp.ok();
}catch (AuthenticationException e){
    return Rsp.error("用户名或密码错误");
}
}
在浏览器 输入 http://localhost:8991/login

登录后可以进入文章列表页面
4.7 加入测试模块
按照标准流程,我们是要加入单页测试。一般单元测试是在每个功能做完后,就把单元测试用例写完。这样就不会忘记,也不需要重复去做某个功能。但是这里写的实战教程,就单独拿出来说下。
本章使用自带的 spring-boot-test-starter 框架进行单元测试
4.7.1 Spring Boot Test 简介
spring-boot-test-starter 中主要使用了以下几个注解完成测试功能
@BeforeClass 在所有测试方法前执行一次,一般在其中写上整体初始化的代码
@AfterClass 在所有测试方法后执行一次,一般在其中写上销毁和释放资源的代码
@Before 在每个测试方法前执行,一般用来初始化方法(比如我们在测试别的方法时,类中与其他测试方法共享的值已经被改变,为了保证测试结果的有效性,我们会在@Before注解的方法中重置数据)
@After 在每个测试方法后执行,在方法执行完成后要做的事情
@Test(timeout = 1000) 测试方法执行超过1000毫秒后算超时,测试将失败
@Test(expected = Exception.class) 测试方法期望得到的异常类,如果方法执行没有抛出指定的异常,则测试失败
@Ignore(“not ready yet”) 执行测试时将忽略掉此方法,如果用于修饰类,则忽略整个类
@Test 编写一般测试用例
@RunWith 在JUnit中有很多个Runner,他们负责调用你的测试代码,每一个Runner都有各自的特殊功能,你要根据需要选择不同的Runner来运行你的测试代码。
4.7.2 MockMVC
测试Web应用程序,通常使用 MockMVC 测试Controller
使用MockMVC的关键是
在独立项目中使用
MockMvcBuilders.standaloneSetup
在web项目中使用
MockMvcBuilders.webAppContextSetup
4.7.3 Pom中加入依赖
这个已经有了
1
2
3
4
5
<``dependency``>
<``groupId``>org.springframework.boot</``groupId``>
<``artifactId``>spring-boot-starter-test</``artifactId``>
<``scope``>test</``scope``>
</``dependency``>
4.7.4 编写基于Controller的单元测试
1
2
3
4
5
6
7
8
9
10
11
12
13
14
15
16
17
18
19
20
21
22
23
24
25
26
27
28
29
30
31
32
33
34
35
36
37
38
39
40
41
42
@RunWith``(SpringRunner.``class``)
@SpringBootTest``(classes = SpringstudyApplication.``class``)
@AutoConfigureMockMvc
public class ArticleControllerTests {
private URL base;
private MockMvc mvc;
@Autowired
private WebApplicationContext webApplicationContext;
/**
* 在测试之前 初始化mockmvc
* */
@Before
public void testBefore() throws Exception{
String url = "http://localhost:8991"``;
this``.base = new URL(url);
mvc = MockMvcBuilders.webAppContextSetup(webApplicationContext).build();
}
@After
public void testAfter(){
System.out.println(``"测试后"``);
}
/**
* 使用一个测试
* */
@Test
public void saveTest() throws Exception{
MultiValueMap<String, String> map = new LinkedMultiValueMap<>();
map.add(``"title"``, "是时候认真学习SpringBoot了"``);
map.add(``"content"``, "是时候认真学习SpringBoot了"``);
mvc.perform(MockMvcRequestBuilders.post(``"/article/save"``).accept(MediaType.ALL)
.params(map))
.andExpect(MockMvcResultMatchers.status().isOk())
.andDo(MockMvcResultHandlers.print());
}
}
问题:因为没有使用过MockMvc,总是测试失败,其实对于陌生的功能点,最好找个简明的知识点学习下。
4.8 加入Web全局拦截器WebMvcConfigurer
通常我们在程序中需要全局处理包括
1)时间格式化问题
2)跨域请求问题
3)路由适配大小写问题
等等,这些问题,不可能在每个页面每个功能的时候一一去做处理,这样工作繁琐,并且容易忘记处理。这里需要加入全局配置。
在Spring Boot 2.0 (Spring 5.0)中已经取消了 WebMvcConfigurerAdapter
1
2
3
4
5
6
7
8
9
10
11
12
13
14
15
16
17
18
19
20
21
22
23
24
25
26
27
@Configuration
public class WebConfigurer implements WebMvcConfigurer {
/**
* 注入路径匹配规则 忽略URL大小写
* */
@Override
public void configurePathMatch(PathMatchConfigurer configurer) {
org.springframework.util.AntPathMatcher matcher=``new org.springframework.util.AntPathMatcher();
matcher.setCachePatterns(``false``);
configurer.setPathMatcher(matcher);
}
/**
* 支持跨域提交
* */
@Override
public void addCorsMappings(CorsRegistry registry) {
registry.addMapping(``"/**"``)
.allowCredentials(``true``)
.allowedHeaders(``"*"``)
.allowedOrigins(``"*"``)
.allowedMethods(``"*"``);
}
}
4.9 加入日志(slf4j+logback)功能
日志功能,无论是哪个插件,基本都是相似的,其日志层级包括了
TARCE , DEBUG , INFO , WARN , ERROR , FATAL , OFF
其市场上主要的插件包括
1)slf4j
2)log4j
3)logback
4)log4j2
本章使用slf4j+logback,slf4j是内置的日志记录组件,logback则主要用来保存记录
4.9.1 在Pom.xml 引入依赖
默认已经包括了slf4j,据说springboot的log就是slf4j提供的。
4.9.1 配置日志框架
引入依赖成功后,就可以使用log了,不过想要漂亮的使用log,我们还需要知道一些配置比如我们会有一些疑问
1)日志保存在哪里
2)日志是每天一份还是一直保存到一份里面
3)能不能像增加注解一样指定哪些类或方法使用日志
具体配置如下:
1
2
3
4
5
logging:
level:
root: error
com.fishpor.springstudy: info
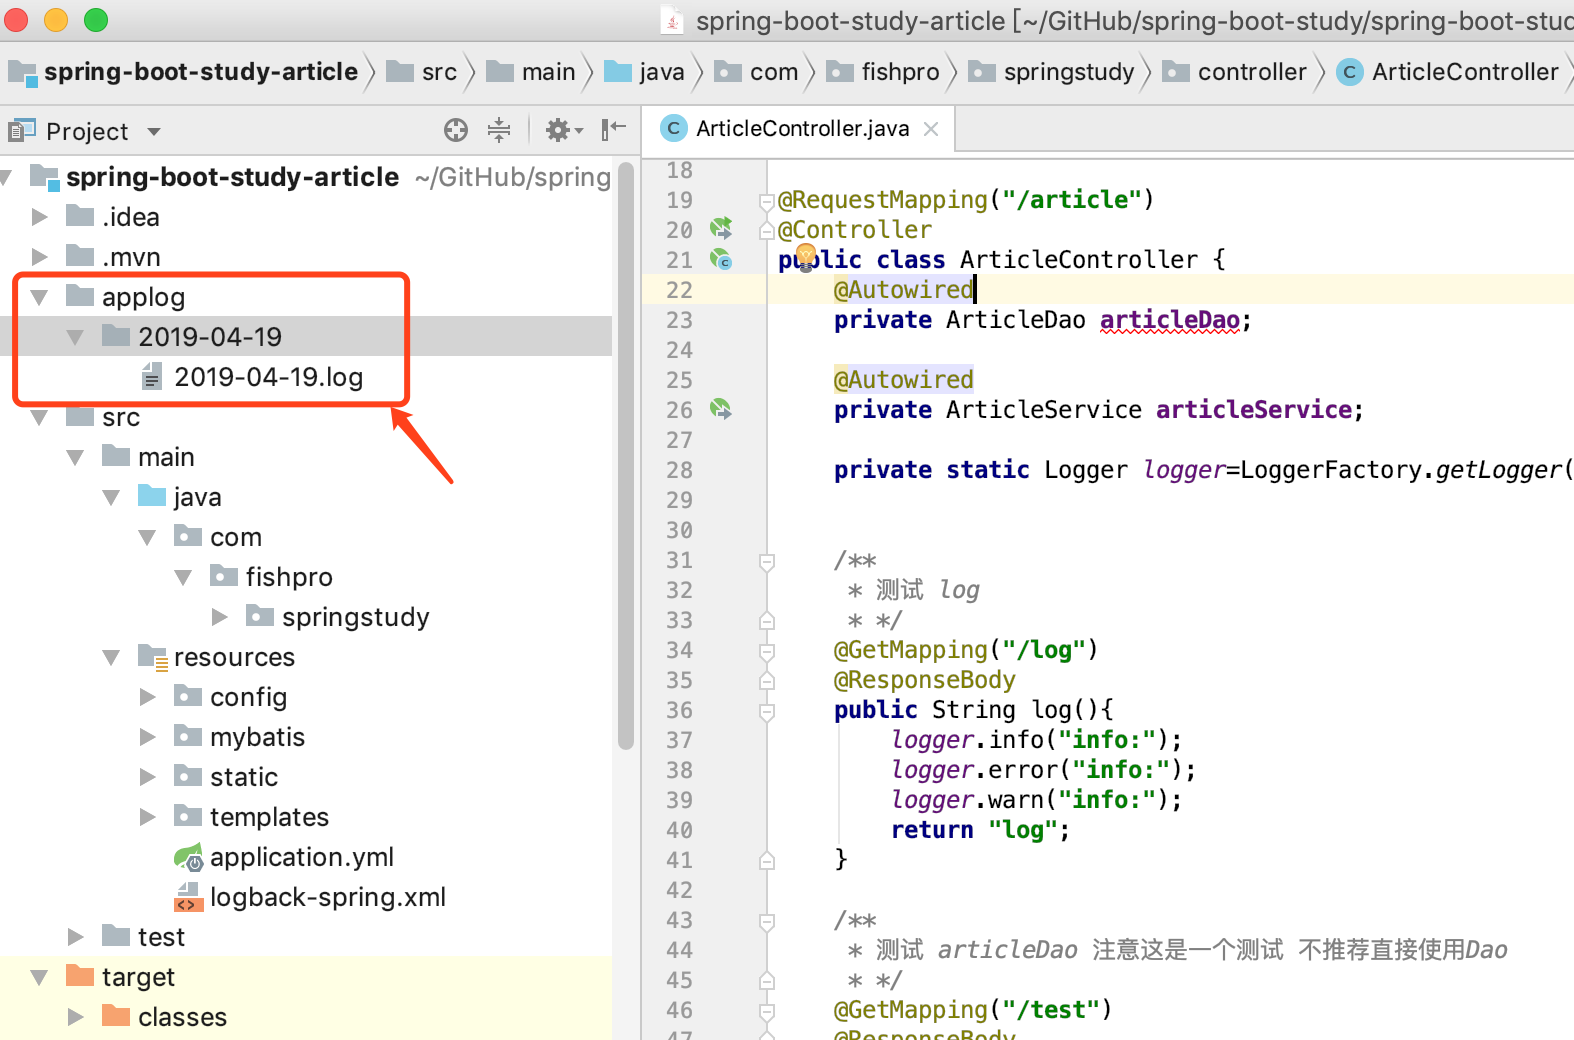
logback配置则使用xml,具体路径是 resources/logback-spring.xml ,没有此文件则新建文件,加入如下代码
1
2
3
4
5
6
7
8
9
10
11
12
13
14
15
16
17
18
19
20
21
22
23
24
25
26
27
28
29
30
31
32
33
34
35
<?``xml version="1.0" encoding="UTF-8"?>
<``configuration scan="true" scanPeriod="60 seconds" debug="false">
<``contextName``>logback</``contextName``>
<``appender name="console" class="ch.qos.logback.core.ConsoleAppender">
<``encoder``>
<``pattern``>%d{HH:mm:ss} [%thread] %-5level %logger{36} - %msg%n</``pattern``>
</``encoder``>
</``appender``>
<``appender name="logFile" class="ch.qos.logback.core.rolling.RollingFileAppender">
<``Prudent``>true</``Prudent``>
<``rollingPolicy class="ch.qos.logback.core.rolling.TimeBasedRollingPolicy">
<``FileNamePattern``>
applog/%d{yyyy-MM-dd}/%d{yyyy-MM-dd}.log
</``FileNamePattern``>
</``rollingPolicy``>
<``layout class="ch.qos.logback.classic.PatternLayout">
<``Pattern``>
%d{yyyy-MM-dd HH:mm:ss} -%msg%n
</``Pattern``>
</``layout``>
</``appender``>
<``logger name="com.glsafesports.pine" additivity="false">
<``appender-ref ref="console"/>
<``appender-ref ref="logFile" />
</``logger``>
<``root level="error">
<``appender-ref ref="console"/>
<``appender-ref ref="logFile" />
</``root``>
</``configuration``>
4.9.2 在代码中应用
在ArticleController中加入测试方法
1
2
3
4
5
6
7
8
9
10
11
/**
* 测试 log
* */
@GetMapping``(``"/log"``)
@ResponseBody
public String log(){
logger.info(``"info:"``);
logger.error(``"info:"``);
logger.warn(``"info:"``);
return "log"``;
}
4.9.3 运行效果
4.10 加入缓存功能
缓存也是我们系统中常用的功能,这里我们使用比较简单的 ehcache。
另外时下更多的使用 redis 来作为缓存,这个后面单独实战。
4.10.1 在Pom.xml中加入依赖
前面介绍Shiro的时候已经
4.10.2 配置缓存
在前介绍过 编写resources\config\ehcache.xml
1
2
3
4
5
6
7
8
9
10
11
12
<?``xml version="1.0" encoding="UTF-8"?>
<``ehcache xmlns:xsi="http://www.w3.org/2001/XMLSchema-instance"
xsi:noNamespaceSchemaLocation="http://ehcache.org/ehcache.xsd"
updateCheck="false">
<``diskStore path="java.io.tmpdir/Tmp_EhCache" />
<``defaultCache eternal="false" maxElementsInMemory="1000"
overflowToDisk="false" diskPersistent="false" timeToIdleSeconds="0"
timeToLiveSeconds="600" memoryStoreEvictionPolicy="LRU" />
<``cache name="role" eternal="false" maxElementsInMemory="10000"
overflowToDisk="false" diskPersistent="false" timeToIdleSeconds="0"
timeToLiveSeconds="0" memoryStoreEvictionPolicy="LFU" />
</``ehcache``>
在配置Shiro的时候,在ShiroConfig中配置过
这里在config包名下建立EhCacheConfig.java
1
2
3
4
5
6
7
8
9
10
11
12
13
14
15
16
17
@Configuration
@EnableCaching
public class EhCacheConfig {
@Bean
public EhCacheCacheManager ehCacheCacheManager(EhCacheManagerFactoryBean bean){
return new EhCacheCacheManager(bean.getObject());
}
@Bean
public EhCacheManagerFactoryBean ehCacheManagerFactoryBean(){
EhCacheManagerFactoryBean cacheManagerFactoryBean=``new EhCacheManagerFactoryBean();
cacheManagerFactoryBean.setConfigLocation(``new ClassPathResource(``"config/ehcache.xml"``));
cacheManagerFactoryBean.setShared(``true``);
return cacheManagerFactoryBean;
}
}
4.10.3 编写缓存代码
使用EhCache使用到两个注解
@Cacheable:负责将方法的返回值加入到缓存中,参数3
@CacheEvict:负责清除缓存,参数4
我们新建一个Controller来测试缓存代码 EhCacheController.java
1) 打开 View>Tool Windows>Terminal
2)在终端输入
>mvn clean
>mvn install
系统会在根目录下生成 target
本章快速实践学习了一套完整的基于Spring Boot开发一个信息管理系统的知识点,本章的目的并不是掌握所有涉及的知识点,而是对Spring Boot整体的项目有一定的了解。对开发的环境有一定的了解。
我们发现几乎所有的功能都可以通过引用第三方依赖实现相关功能,换句话说就是大部分功能别人都写好了。
我们通过总结又发现,所有依赖的功能在使用上都是一致的,他们包括
1)引入pom.xml中的依赖
2)配置插件(各个插件有独立的配置,可以参加插件的官方文档)
3)在代码中编写或使用引入的插件
4)编写测试代码测试
5)运行查看效果