我们这一一篇博客讲的是如何整合Springboot和Mybatis框架,然后使用generator自动生成mapper,pojo等文件。然后再使用阿里巴巴提供的开源连接池druid,这个连接池的好处我就不说了,集合了所有连接池的好处,并且还提供了监控等功能,加大了可扩展性等等。
1. 创建一个springboot项目:
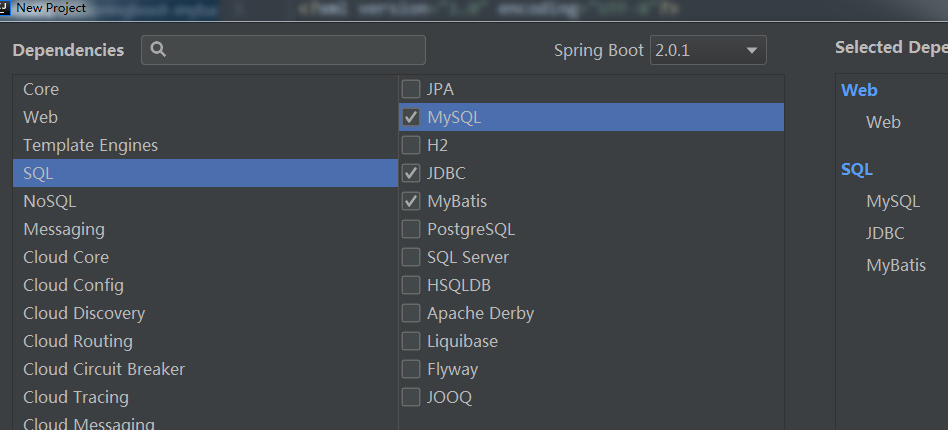
2.可以看到的是我们除了引入web依赖之外还引入了三个依赖,分别是MySQL,JDBC,Mybatis,我们如下观看一下完整的依赖情况:

1
2 <project xmlns=”http://maven.apache.org/POM/4.0.0“ xmlns:xsi=”http://www.w3.org/2001/XMLSchema-instance“
3 xsi:schemaLocation=”http://maven.apache.org/POM/4.0.0 http://maven.apache.org/xsd/maven-4.0.0.xsd">
4
5
6
7
8
9
10
11
12
13
14
15
16
17
18
19
20
21
22 <project.build.sourceEncoding>UTF-8</project.build.sourceEncoding>
23 <project.reporting.outputEncoding>UTF-8</project.reporting.outputEncoding>
24 <java.version>1.8</java.version>
25
26
27
28
29
30
31
32
33
34
35
36
37
38
39
40
41
42
43
44
45
46
47
48
49
50
51
52
53
54
55
56
57
58
59
60
61
62
63
64
65
66
67
68
69
70
71
72
73
74
75
76
77
78
79
80
81
82
83
84
85
86
87
88
89
90
91
92
93
94
95
96
97
98
99
100
101
102
103
104
105
106
107
108
109
110
3.依赖引入完成以后我们再对application.properties配置文件进行编辑:
1 #设置访问端口
2 server.port=80
3
4 #thymeleaf配置,这里是可以省略的,因为默认配置已经足够
5 #关闭缓存,及时刷新页面,这一点很重要
6 spring.thymeleaf.cache=false
7 #注释的部分是Thymeleaf默认的配置,如有其它需求可以自行更改
8 #spring.thymeleaf.prefix=classpath:/templates/
9 #spring.thymeleaf.suffix=.html 10 #spring.thymeleaf.mode=HTML5 11 #spring.thymeleaf.encoding=UTF-8
12 #spring.thymeleaf.servlet.content-type=text/html 13
14
15 #设置热部署 16 #开启热部署 17 spring.devtools.restart.enabled=true
18 #重启范围 19 spring.devtools.restart.additional-paths=src/main/java 20
21 #设置数据源 22 #数据库连接用户名 23 spring.datasource.username=root 24 #数据库连接密码 25 spring.datasource.password=123
26 #驱动 27 spring.datasource.driver-class-name= com.mysql.jdbc.Driver 28 #数据库连接路径 29 spring.datasource.url=jdbc:mysql://localhost:3306/bysj
30 #连接池类型 31 spring.datasource.type=com.alibaba.druid.pool.DruidDataSource 32
33 #连接池配置,因为springboot默认是开启了连接池的,它有默认配置,这一段可以忽略 34 # 初始化大小,最小,最大 35 spring.datasource.initialSize=5
36 spring.datasource.minIdle=5
37 spring.datasource.maxActive=20
38 # 配置获取连接等待超时的时间 39 spring.datasource.maxWait=60000
40 # 配置间隔多久才进行一次检测,检测需要关闭的空闲连接,单位是毫秒 41 spring.datasource.timeBetweenEvictionRunsMillis=60000
42 # 配置一个连接在池中最小生存的时间,单位是毫秒 43 spring.datasource.minEvictableIdleTimeMillis=300000
44 spring.datasource.validationQuery=SELECT 1 FROM DUAL 45 spring.datasource.testWhileIdle=true
46 spring.datasource.testOnBorrow=false
47 spring.datasource.testOnReturn=false
48 # 打开PSCache,并且指定每个连接上PSCache的大小 49 spring.datasource.poolPreparedStatements=true
50 spring.datasource.maxPoolPreparedStatementPerConnectionSize=20
51 # 配置监控统计拦截的filters,去掉后监控界面sql无法统计,’wall’用于防火墙 52 spring.datasource.filters=stat,wall,log4j 53 # 通过connectProperties属性来打开mergeSql功能;慢SQL记录 54 spring.datasource.connectionProperties=druid.stat.mergeSql=true;druid.stat.slowSqlMillis=500
55
56 #配置mybatis 57 mybatis.mapper-location=classpath:mapping/*.xml 58 #全局的映射,不用在xml文件写实体类的全路径 59 mybatis.type-aliases-package=com.zsl.pojo 60 #开启驼峰映射
mybatis.configuration.map-underscore-to-camel-case=true
61 #配置分页插件 62 #pagehelper分页插件 pagehelper.helper-dialect=mysql
pagehelper.reasonable=true
pagehelper.support-methods-arguments=true
pagehelper.params=count=countSql
4. 配置generator自动生成代码:文件放置的位置就在pom.xml文件里面一如插件的位置${basedir}/src/main/resources/generator/generatorConfig.xml
1
2
5
6
7
8
9
10
11
12
13
14
15
16
17
18
19
20
21
22
23
24
25
26
27
28
29
30
31
32
33
34
35
36
5.创建数据库以及表格
CREATE DATABASE bysj;
CREATE TABLE user(
user_id INT NOT NULL PRIMARY KEY AUTO_INCREMENT,
user_name VARCHAR(255) NOT NULL ,
password VARCHAR(255) NOT NULL ,
phone VARCHAR(255) NOT NULL
) ENGINE=INNODB AUTO_INCREMENT=1000 DEFAULT CHARSET=utf8;
6. 操作IDEA生成代码:Run–>Edit Configurations

回到下图所示页面的时候点击三角即可:

7.查看项目情况以及生成代码:
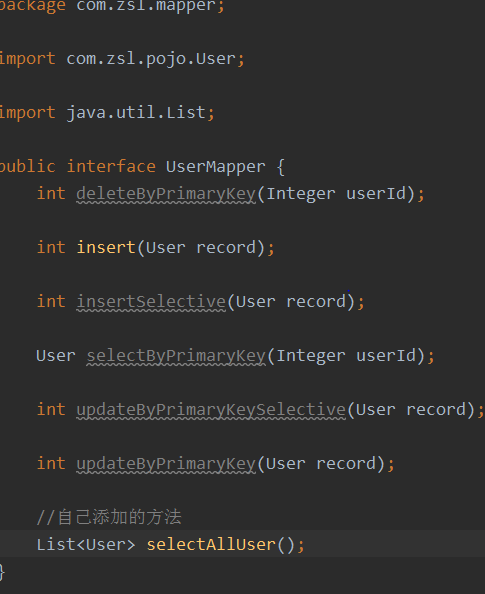
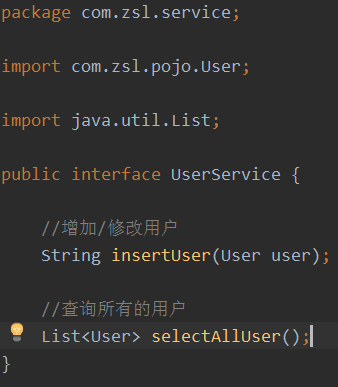
7.1:生成的mapper:
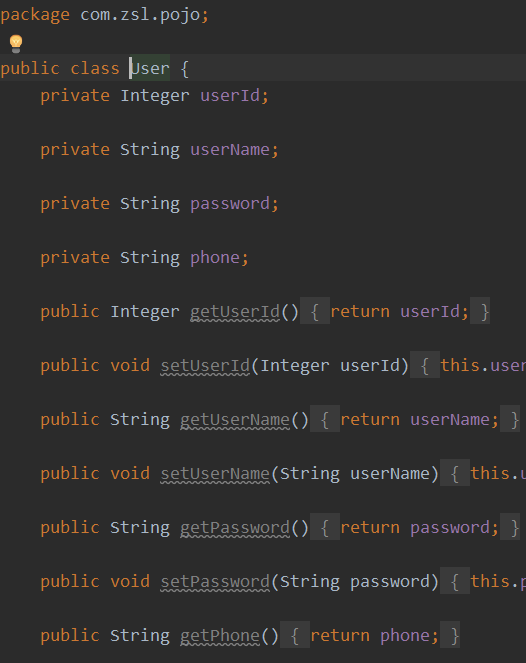
7.2:生成的pojo实体类:
7.3生成的mapper的xml文件:在这里务必要注意namespace是否正确,请注意查看这一点
1
2
3
4
5
6
7
8
9
10
11 user_id, user_name, password, phone 12
<select id=“selectAllUser” resultType=“user”>
select
<include refid=“Base_Column_List” />
from user;
13
19
20 delete from user 21 where user_id = #{userId,jdbcType=INTEGER} 22
23
24 insert into user (user_id, user_name, password, 25 phone) 26 values (#{userId,jdbcType=INTEGER}, #{userName,jdbcType=VARCHAR}, #{password,jdbcType=VARCHAR}, 27 #{phone,jdbcType=VARCHAR}) 28
29
30 insert into user 31
32
33 user_id, 34 </if>
35
36 user_name, 37 </if>
38
39 password, 40 </if>
41
42 phone, 43 </if>
44
45
46
47 #{userId,jdbcType=INTEGER}, 48 </if>
49
50 #{userName,jdbcType=VARCHAR}, 51 </if>
52
53 #{password,jdbcType=VARCHAR}, 54 </if>
55
56 #{phone,jdbcType=VARCHAR}, 57 </if>
58
59
60
61 update user 62
63
64 user_name = #{userName,jdbcType=VARCHAR}, 65 </if>
66
67 password = #{password,jdbcType=VARCHAR}, 68 </if>
69
70 phone = #{phone,jdbcType=VARCHAR}, 71 </if>
72
73 where user_id = #{userId,jdbcType=INTEGER} 74
75
76 update user 77 set user_name = #{userName,jdbcType=VARCHAR}, 78 password = #{password,jdbcType=VARCHAR}, 79 phone = #{phone,jdbcType=VARCHAR} 80 where user_id = #{userId,jdbcType=INTEGER} 81
82
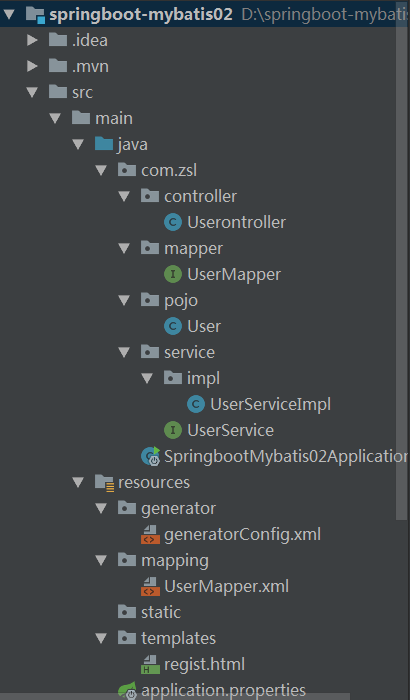
7.4项目的总体结构:
7.5 自己用于测试分页,驼峰映射,实体类映射等配置的controller,service
1 package com.zsl.controller; 2
3 import com.zsl.pojo.User; 4 import com.zsl.service.impl.UserServiceImpl; 5 import org.springframework.stereotype.Controller; 6 import org.springframework.web.bind.annotation.RequestMapping; 7 import org.springframework.web.bind.annotation.ResponseBody; 8
9 import javax.annotation.Resource; 10 import java.util.List; 11
12 @Controller 13 public class Userontroller { 14
15 @Resource 16 private UserServiceImpl userService; 17
18 //增加用户
19 @ResponseBody 20 @RequestMapping(“/insertUser”) 21 public String insertUser(User user){ 22 return userService.insertUser(user); 23 } 24
25 //查询所有的用户
26 @ResponseBody 27 @RequestMapping(“/selectAllUser”) 28 public String getAllUser(){ 29 List
1 package com.zsl.service.impl; 2
3 import com.zsl.mapper.UserMapper; 4 import com.zsl.pojo.User; 5 import com.zsl.service.UserService; 6 import org.springframework.beans.factory.annotation.Autowired; 7 import org.springframework.stereotype.Service; 8
9 import java.util.List; 10
11 @Service 12 public class UserServiceImpl implements UserService { 13
14 @Autowired 15 private UserMapper userMapper;//报错不影响
16 /*
17 * 增加/修改用户 18 * */
19 @Override 20 public String insertUser(User user) { 21 //增加用户
22 if(user.getUserId() == null){ 23 Integer i = userMapper.insert(user); 24 if(i != 0 && i != null){ 25 return “success”; 26 } 27 } 28 return null; 29 } 30
31 @Override 32 public List
34 List
注意:在实验的时候务必要在启动类上加上MapperScna注解,指定扫描mapper文件,或者可以在每个mapper文件上加mapper注解,不过这样太麻烦了: