本文将介绍以下内容:
- EdgeX 编译和EdgeX docker image 编译
- EdgeX 部署的基本环境准备
- EdgeX CLI
- EdgeX 连接 Modbus设备
- EdgeX 连接MQTT设备
- 分布式部署Device Service
- 如何设定定时任务
- 基于Release1.3.0(Hanoi)版本
实验设备
本文将同时基于x86-64架构设备和ARM64(AARCH64)设备进行实验,下面是硬件信息表
x86-64 设备
CPU
Intel® Core™ i5-7267U CPU @ 3.10GHz 单CPU双核四线程
Mem
7.7Gi
Disk
110GB
NIC
1000Mb/s
OS
Ubuntu 20.04.2 LTS (Focal Fossa)
kernel
5.8.0-43-generic
ARM64 设备
CPU
AArch64 Processor rev 12 (aarch64) Qualcomm Technologies, Inc SDA845双CPU八核八线程
Mem
3.5G
Disk
64GB
NIC
1000Mb/s
OS
Ubuntu 16.04.4 LTS (Xenial Xerus)
kernel
4.9.103
基础软件环境准备
- 安装docker
a. 参考:https://docs.docker.com/engine/install/ubuntu/
1 |
|
- 安装docker-compose
a. 参考:https://docs.docker.com/compose/install/
1 |
|
- 安装go语言环境(如果需要编译源码)
a. 参考:https://golang.org/dl/
b. 下载&安装合适版本golang安装包(当前需要 >=1.15.x)
1 | wget https://golang.org/dl/go1.15.8.linux-amd64.tar.gz |
c. 配置环境变量
1 |
|
d. 配置国内依赖下载资源
1 | go env -w GO111MODULE=on |
e. 其他依赖(如果需要编译源码)
1 | sudo apt install -y libtool pkg-config build-essential \ |
EdgeX 编译源码
- 下载源码
1 | sudo apt install -y git |
- 编译
1 | cd edgex-go |
部署EdgeX
部署方式
- snap
- native binaries
- docker-compose
- kubernetes
native binaries
在上述编译源码完成的基础上,在edgex-go/目录下:(注意需要提前配置好数据库)
1 | make run |
docker-compose
docker-compose 部署需要edgex各微服务的容器镜像,在上述源码编译中最后一步(make docker)可以生成docker 镜像,也可以使用 Docker Hub上有已经编译好的docker 镜像。
可以使用github上提供的edgex部署脚本中的docker-compose的yaml文件进行部署,方法最为简便,方法如下:
- 下载配置文件
1 | git clone https://github.com/edgexfoundry/developer-scripts.git |
- 选择对应的release版本
1 |
|

3. UI
1 |
|
- 当前版本的UI只是一个开发测试版本,并不是商业版本
- 此时可通过浏览器访问本机4000端口访问到UI页面(可以尝试用github上最新的ui代码编译镜像)

edgex-cli 是用以和edgex微服务交互的命令行接口(工具)。取代以往使用curl命令的方式访问edgex内部的微服务接口。
- 安装
1 | sudo snap install edgex-cli |

Modbus 设备
部署Modbus设备服务
1 | vim add-device-modbus.yml |
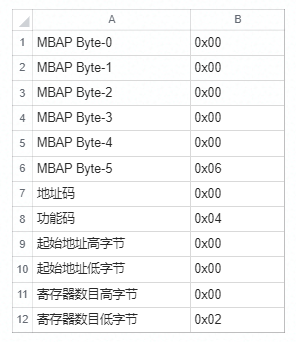
获取数据的例子(GET)—— RST5900
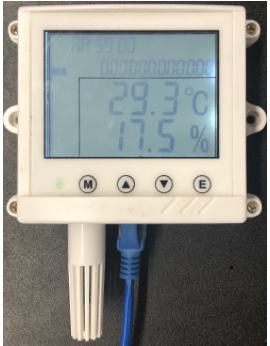
设备介绍
RST5900 是一个温湿度一体的传感器,有温度值和湿度值两个数据源。具体信息如下:
- 协议和连接信息

- Modbus通讯协议功能代码

- 获取温湿度请求报文

- 传感器应答数据
设备调试
1 | #include <stdio.h> |
编译运行
1 | gcc rst_5900_test.c -o rst_5900_test |

创建 profile
1 |
|
关于profile的介绍:
1 | 关于profile的介绍: |
- (引)For example, a Modbus device stores the temperature and humidity in an INT16 data type with a float scale of 0.01. If the temperature is 26.53, the read value is 2653. However, following transformation, the value is 26.
设备接入
- 上传profile
1 | edgex-cli profile add -f rst_5900_profile.yaml |

2. 添加设备
1 |
|
获取数据
- 查看设备
1 | edgex-cli device list |

2. 获取数据
1 |
|

3. 获取历史数据
1 |
|

下发控制的例子(SET)—— Patlite LA6
设备介绍
Patlite LA6 是一组有5个LED灯和一个蜂鸣器的报警器。LED灯和蜂鸣器可以单独控制或群组控制,具体操作需要查看说明书的寄存器手册。本例只使用5个LED的单独控制作为例子,演示对Modbus设备的控制。
- 协议和连接信息

- Modbus通讯协议
根据说明书寄存器手册可知Holding 寄存器管理单个LED/蜂鸣器,功能码03为读,06为写。
1 | 1. 读取单个LED/蜂鸣器的状态 |


调试设备
1 | #include <stdio.h> |
编译运行
1 | gcc patlite_la6_test.c -o patlite_la6_test |
创建profile
1 | name: "LA6-POE" |
设备接入
- 上传profile
1 | edgex-cli profile add -f patlite_la6_led_profile.yaml |

2. 添加设备
1 |
|
通过edgex控制
- 查看设备
1 | edgex-cli device list |

2. 控制设备
通过coreCommands——deviceResource(LED1)
1 |
|

3. 通过coreCommands——deviceCommands——deviceResources组合(LED1~LED5)
1 |
|

4. 获取设备状态
1 | curl -X GET "http://localhost:48082/api/v1/device/name/patlite/command/CUSTOM"|jq . |

MQTT设备
部署MQTT设备服务
- Broker
MQTT Device Service依赖MQTT Broker, 使用时可以单独部署一个MQTT Broker或使用外部的MQTT Broker。在我们本次的实验中,将MQTT Device Service和Broker放在一个yaml文件中部署使用。 - docker-compose.yaml
1 | sudo vim add-device-mqtt.yml |
MQTT Device Service 的几种模式

设备主动上报数据

设备服务请求

虚拟一个EdgeX MQTT设备
模拟设备程序
该设备有一个resource : time; cmd为:localtime;支持get / set
1 |
|
profile
1 | name: "Test.Device.MQTT.Profile" |
创建设备
- 上传profile
1 | edgex-cli profile add -f mqtt_device_profile.yaml |
- 添加设备
1 |
|
启动模拟的设备程序
1 | pip3 install paho.mqtt |
查看主动上报的数据
1 | edgex-cli reading list -d mqtt_device |

get
1 | curl -X GET http://localhost:48082/api/v1/device/name/mqtt_device/command/localtime|jq . |

set
1 | curl -X PUT http://localhost:48082/api/v1/device/name/mqtt_device/command/localtime -d '{"time":"12345"}'|jq . |

分布式部署Device Service
DeviceService的分布式部署是该版本(1.3)的一个新feature,下面进行验证。
注销已有的设备服务
以Modbus device service为例
1 |
|

解除服务对localhost的限制
- 需要修改docker-compose-*.yaml 允许从localhost之外的端口访问
- 如果启用API Gateway 应该可以例外(参考:https://docs.edgexfoundry.org/1.3/microservices/security/Ch-APIGateway/)
1 | vim docker-compose-hanoi.yml |

删除device service的旧记录
Consul 作为保存了所有微服务的注册信息,如果不删除,将会继续使用旧的配置
1 |
|
在其他节点重新启动device service
1 | 需要修改device service的docker-compose file。有几点需要注意: |
1 | vim add-device-modbus.yml |
设置定时任务 —— Scheduler & event
Scheduler 微服务提供了内部时钟(计时器),和事件event(触发器)以定时发送请求。下面我们创建一个每10秒读一次温湿度数据的任务。
1 |
|
- name - 唯一名称
- start - 生效时间,以ISO 8601 YYYYMMDD’T’hhmmss格式表示。空意味着现在。
- end - 失效时间,同上。
- frequency - 频度,以ISO 8601 PxYxMxD’T’xHxMxS格式表示。空意味着没有频率
1 |
|
- name - 动作唯一名称
- interval - 间隔唯一名称,与Scheduler名称对应
- target - 间隔 操作接收者名称(ergo service or name).
- protocol - 通讯协议 (example HTTP).
- httpMethod - HTTP protocol verb.
- address - IP.
- port -端口.
- path - url 路径.
- parameters - (可选)参数例如 http post的 data
1 |
|


RulesEngine
- 参考:
- https://github.com/emqx/kuiper/blob/master/docs/en\_US/edgex/edgex\_rule\_engine\_command.md
规则引擎在这一版本中使用的是EMQ的kuiper,下面的简单实例是创建一个当湿度大于50%时,LED1亮的规则。
- https://github.com/emqx/kuiper/blob/master/docs/en\_US/edgex/edgex\_rule\_engine\_command.md
1 |
|

配置完成后当湿度大于50%,LED1会亮灯