官方文档(中文)
节点名称
节点IP
配置
系统版本
VIP
192.168.50.220
虚拟IP
k8s-master-221
192.168.50.221
4核 2G
debian 11
k8s-master-222
192.168.50.222
4核 2G
debian 11
k8s-master-223
192.168.50.223
4核 2G
debian 11
k8s-node-224
192.168.50.224
4核 2G
debian 11
k8s-node-225
192.168.50.225
4核 2G
debian 11
主机配置 时间同步 配置 hostname 注意节名称不能重复
1 hostnamectl --static set-hostname k8s-master-221
配置防火墙 1 2 3 4 5 service iptables stop iptables -F systemctl stop firewalld && systemctl disable firewalld
如果需要打开防火墙,执行以下配置
1 2 3 4 5 6 7 8 9 10 11 12 13 14 ufw allow 6443/tcp ufw allow 2379/tcp ufw allow 2380/tcp ufw allow 10250/tcp ufw allow 10251/tcp ufw allow 10252/tcp ufw allow 10255/tcp ufw reload ufw allow 10250/tcp ufw allow 30000:32767/tcp ufw reload
关闭交换分区 1 2 swapoff -a set -ri 's/.*swap.*/#&/' /etc/fstab
若需允许交换分区参考官方文档 交换分区的配置
配置hosts 1 2 3 4 5 6 7 cat >> /etc/hosts << EOF 192.168.50.221 k8s-master-221 192.168.50.222 k8s-master-222 192.168.50.223 k8s-master-223 192.168.50.224 k8s-worker-224 192.168.50.225 k8s-worker-225 EOF
开启 bridge 网桥过滤功能 1 2 3 4 5 6 7 8 9 10 11 12 13 14 15 16 17 18 19 20 21 cat << EOF | sudo tee /etc/modules-load.d/k8s.conf overlay br_netfilter EOF sudo modprobe overlaysudo modprobe br_netfiltercat << EOF | sudo tee /etc/sysctl.d/k8s.conf net.bridge.bridge-nf-call-iptables = 1 # 开启网桥模式(必须) net.bridge.bridge-nf-call-ip6tables = 1 # 开启网桥模式(必须) net.ipv4.ip_forward = 1 # 转发模式(默认开启) vm.panic_on_oom = 0 # 开启OOM(默认开启) vm.swappiness = 0 # 禁止使用swap空间 vm.overcommit_memory = 1 # 不检查物理内存是否够用 EOF sudo sysctl --system
配置 IPVS 1 2 3 4 5 6 7 8 9 10 11 modprobe br_netfilter cat > /etc/sysconfig/modules/ipvs.modules << EOF #!/bin/bash modprobe -- ip_vs modprobe -- ip_vs_rr modprobe -- ip_vs_wrr modprobe -- ip_vs_sh modprobe -- nf_conntrack_ipv EOF
安装工具 安装 Containerd 1 2 3 4 5 6 7 apt update apt install -y containerd containerd config default | sudo tee /etc/containerd/config.toml >/dev/null 2>&1
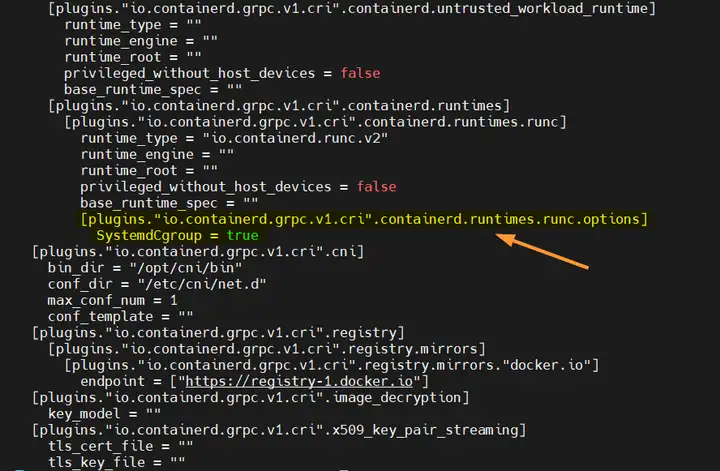
设置cgroupdriver为systemd,编辑 /etc/containerd/config.toml 文件,找到 [plugins."io.containerd.grpc.v1.cri".containerd.runtimes.runc.options] 部分,添加一行内容:SystemdCgroup = true
1 sed -i 's/SystemdCgroup \= false/SystemdCgroup \= true/g' /etc/containerd/config.toml
重启containerd并设置开机启动
1 2 systemctl restart containerd systemctl enable containerd
安装 keadm,kubelete,kubectl 1 2 3 4 5 6 apt update apt install -y kubelet kubeadm kubectl apt-mark hold kubelet kubeadm kubectl
部署高可用(仅 master 节点) 安装 1 apt install keepalived haproxy
修改haproxy配置 /etc/haproxy/haproxy.cfg
1 2 3 4 5 6 7 8 9 10 11 12 13 14 15 16 17 18 19 20 21 22 23 24 25 26 27 28 29 30 31 32 33 34 35 36 37 38 39 40 global maxconn 2000 ulimit-n 16384 log 127.0.0.1 local0 err stats timeout 30s defaults log global mode http option httplog timeout connect 5000 timeout client 50000 timeout server 50000 timeout http-request 15s timeout http-keep-alive 15s frontend monitor-in bind *:33305 mode http option httplog monitor-uri /monitor frontend k8s-master bind 0.0.0.0:16443 bind 127.0.0.1:16443 mode tcp option tcplog tcp-request inspect-delay 5s default_backend k8s-master backend k8s-master mode tcp option tcplog option tcp-check balance roundrobin default-server inter 10s downinter 5s rise 2 fall 2 slowstart 60s maxconn 250 maxqueue 256 weight 100 server k8s-master1 172.16.12.111:6443 check server k8s-master2 172.16.12.112:6443 check server k8s-master3 172.16.12.113:6443 check
配置 keepalived
interface # 网卡名称
k8s-master-221配置文件/etc/keepalived/keepalived.conf
1 2 3 4 5 6 7 8 9 10 11 12 13 14 15 16 17 18 19 20 21 22 23 24 25 26 27 28 29 30 31 ! Configuration File for keepalived global_defs { router_id LVS_DEVEL script_user root enable_script_security } vrrp_script chk_apiserver { script "/etc/keepalived/check_apiserver.sh" #健康检查脚本 interval 5 weight -5 fall 2 rise 1 } vrrp_instance VI_1 { state MASTER #高可用主1 interface eth0 #网卡名称 mcast_src_ip 192.168.50.221 #该节点 IP virtual_router_id 51 priority 100 #设置最高级优先级 advert_int 2 authentication { auth_type PASS auth_pass K8SHA_KA_AUTH } virtual_ipaddress { 192.168.50.220 #vip地址 } track_script { chk_apiserver } }
k8s-master-222配置文件/etc/keepalived/keepalived.conf
1 2 3 4 5 6 7 8 9 10 11 12 13 14 15 16 17 18 19 20 21 22 23 24 25 26 27 28 29 30 31 ! Configuration File for keepalived global_defs { router_id LVS_DEVEL script_user root enable_script_security } vrrp_script chk_apiserver { script "/etc/keepalived/check_apiserver.sh" interval 5 weight -5 fall 2 rise 1 } vrrp_instance VI_1 { state BACKUP #高可用 从1 interface ens33 #网卡名称 mcast_src_ip 192.168.50.222 #该节点 IP virtual_router_id 51 priority 50 #设置优先级 advert_int 2 authentication { auth_type PASS auth_pass K8SHA_KA_AUTH } virtual_ipaddress { 192.168.50.220 #vip地址 } track_script { chk_apiserver } }
k8s-master-222配置文件/etc/keepalived/keepalived.conf
1 2 3 4 5 6 7 8 9 10 11 12 13 14 15 16 17 18 19 20 21 22 23 24 25 26 27 28 29 30 31 ! Configuration File for keepalived global_defs { router_id LVS_DEVEL script_user root enable_script_security } vrrp_script chk_apiserver { script "/etc/keepalived/check_apiserver.sh" interval 5 weight -5 fall 2 rise 1 } vrrp_instance VI_1 { state BACKUP #高可用从2 interface ens33 #网卡名称 mcast_src_ip 192.168.50.223 #该节点 IP virtual_router_id 51 priority 49 #设置优先级 advert_int 2 authentication { auth_type PASS auth_pass K8SHA_KA_AUTH } virtual_ipaddress { 192.168.50.220 #vip地址 } track_script { chk_apiserver } }
健康检查脚本 /etc/keepalived/check_apiserver.sh
1 2 3 4 5 6 7 8 9 10 11 12 13 14 15 16 17 18 19 20 21 #!/bin/bash err=0 for k in $(seq 1 3);do check_code=$(pgrep haproxy) if [[ $check_code == "" ]]; then err=$(expr $err + 1) sleep 1 continue else err=0 break fi done if [[ $err != "0" ]]; then echo "systemctl stop keepalived" /usr/bin/systemctl stop keepalived exit 1 else exit 0 fi
给监测脚本添加执行权限
1 chmod +x /etc/keepalived/check_apiserver.sh
启动keepalive和haproxy
1 2 3 4 5 6 systemctl daemon-reload systemctl start haproxy && systemctl enable haproxy systemctl start keepalived && systemctl enbale keepalived
测试vip漂移 1 2 3 4 5 hostname -I nc -v 192.168.50.220 16443
初始化集群 拉取镜像 1 2 3 4 5 kubeadm config images list kubeadm config images pull
master 节点初始化 1 2 3 4 5 kubeadm config print init-defaults > kubeadm-config.yaml kubeadm token create --print-join-command
master 节点加入集群 1 2 3 4 5 6 kubeadm init --control-plane-endpoint=192.168.50.220:16443 kubeadm join 192.168.50.220:16443 --token {token} \ --discovery-token-ca-cert-hash {} \ --control-plane --certificate-key {}
worker 节点加入集群 1 2 kubeadm join 192.168.50.220:16643 --token {token} \ --discovery-token-ca-cert-hash {}
从集群种移除节点
1 kubectl delete node {node-name}
配置环境变量,用于访问集群 1 2 3 4 5 cat << EOF >> ~/.bashrc export KUBECONFIG=/etc/kubernetes/admin/conf EOF source ~/.bashrc
查看集群节点状态
1 2 3 4 5 6 kubectl get nodes kubectl get all -n kube-system -o wide
安装网络组件(只在master-221节点操作) Calico
去除 master节点污点 如果你打算让Master节点也参与到平常的Pod调度(生产环境一般不会这样做,以保证master节点的稳定性),那么你需要使用以下命令将Master节点上的 taint(污点标记)解除
1 kubectl taint nodes --all node-role.kubernetes.io/master-
最后我们使用以下命令查看当前集群的状态,发现Scheduler和Controller Manager组件处理不健康状态:
解决上述问题需要将每个Master节点上的 /etc/kubernetes/manifests/kube-scheduler.yaml 和 /etc/kubernetes/manifests/kube-controller-manager.yaml 文件中的- –port=0注释掉,然后重启一下各Master节点上的kubelet即可.
测试集群 1 2 3 4 kubectl create deployment nginx --image nginx --replicas 2 kubectl expose deployment nginx --name nginx --type NodePort --port 80 --target-port 80 --node-port 8080 curl http://192.168.50.220:8080
参考如何用 Kubeadm 在 Debian 11 上安装 Kubernetes 集群 | Linux 中国 - 知乎 (zhihu.com) Kubernetes多主多从高可用集群部署 - 个人文章 - SegmentFault 思否 搭建多主节点k8s高可用集群(三主两从一VIP)_kubernetes部署多主多从集群-CSDN博客 github - 基于Ubuntu22.04部署KubeEdge-v1.18.0环境 - 云原生_KubeEdge - SegmentFault 思否